Live Notification
Live notifications provide real-time updates on sales, cart changes, wishlist activity, and visitor engagement. These alerts create urgency by showcasing recent purchases, stock updates, and active shoppers, enhancing the online shopping experience and boosting conversions.
Note: To enable this module on your store, purchase a Live Notification module from the Plugin settings.
How to purchase Live Notification from Plugins?
-
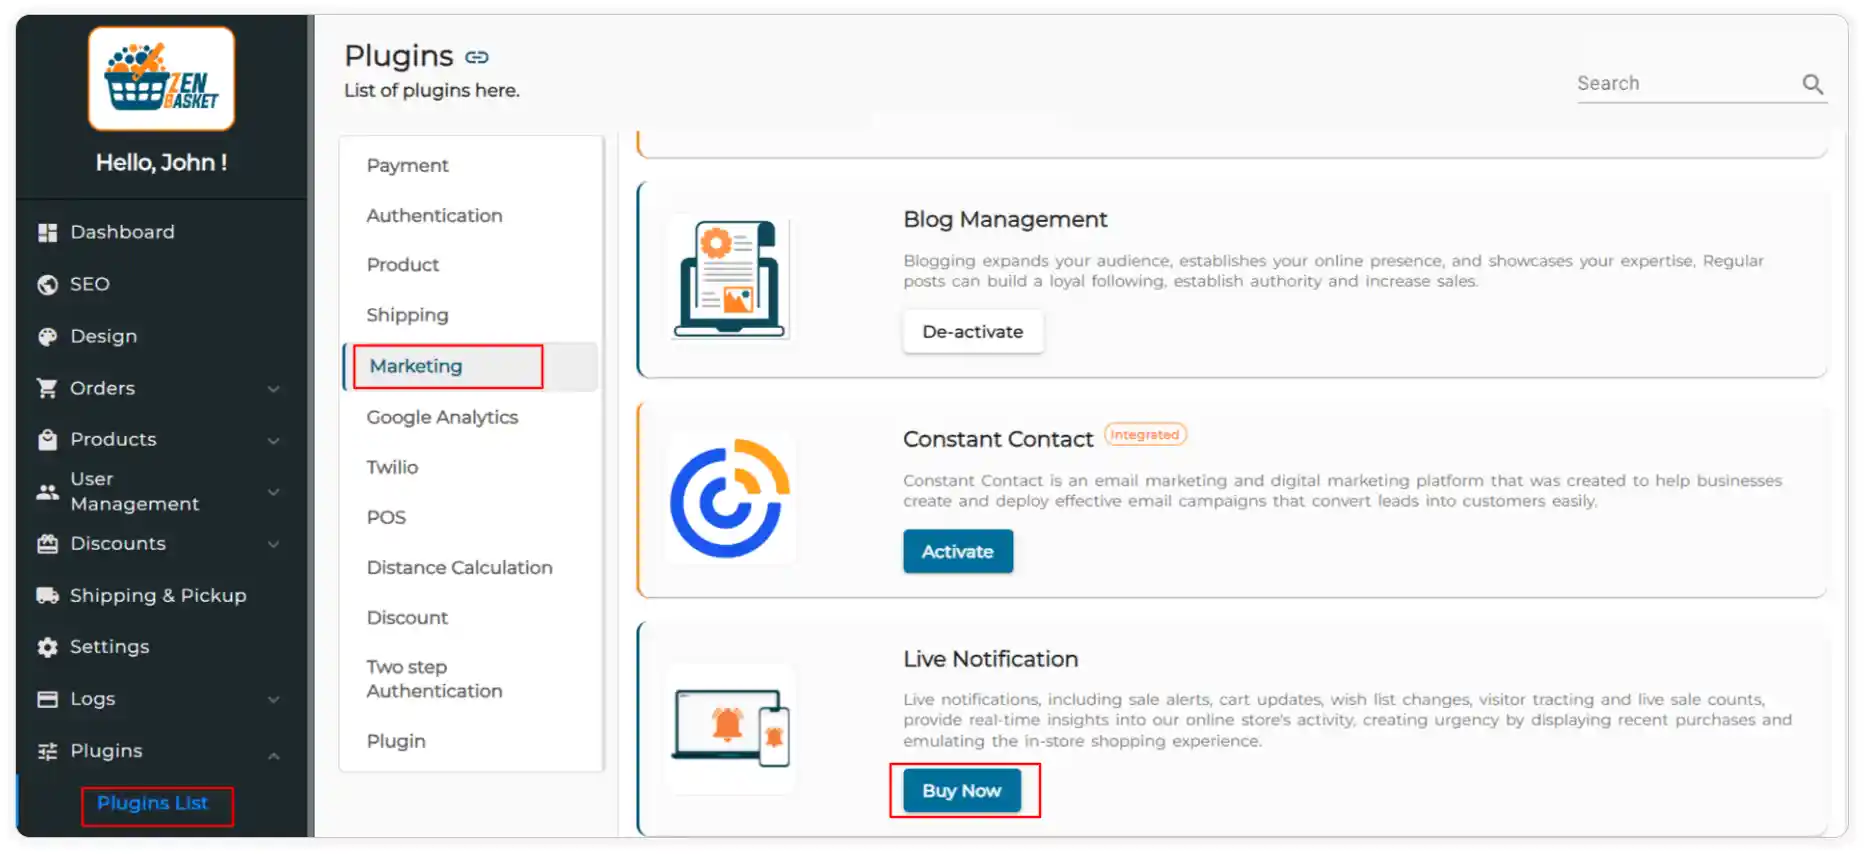
Go to the Plugins List under the Plugins main menu and navigate to the Marketing category.
-
In the Live Notification section, click the Buy Now button.

-
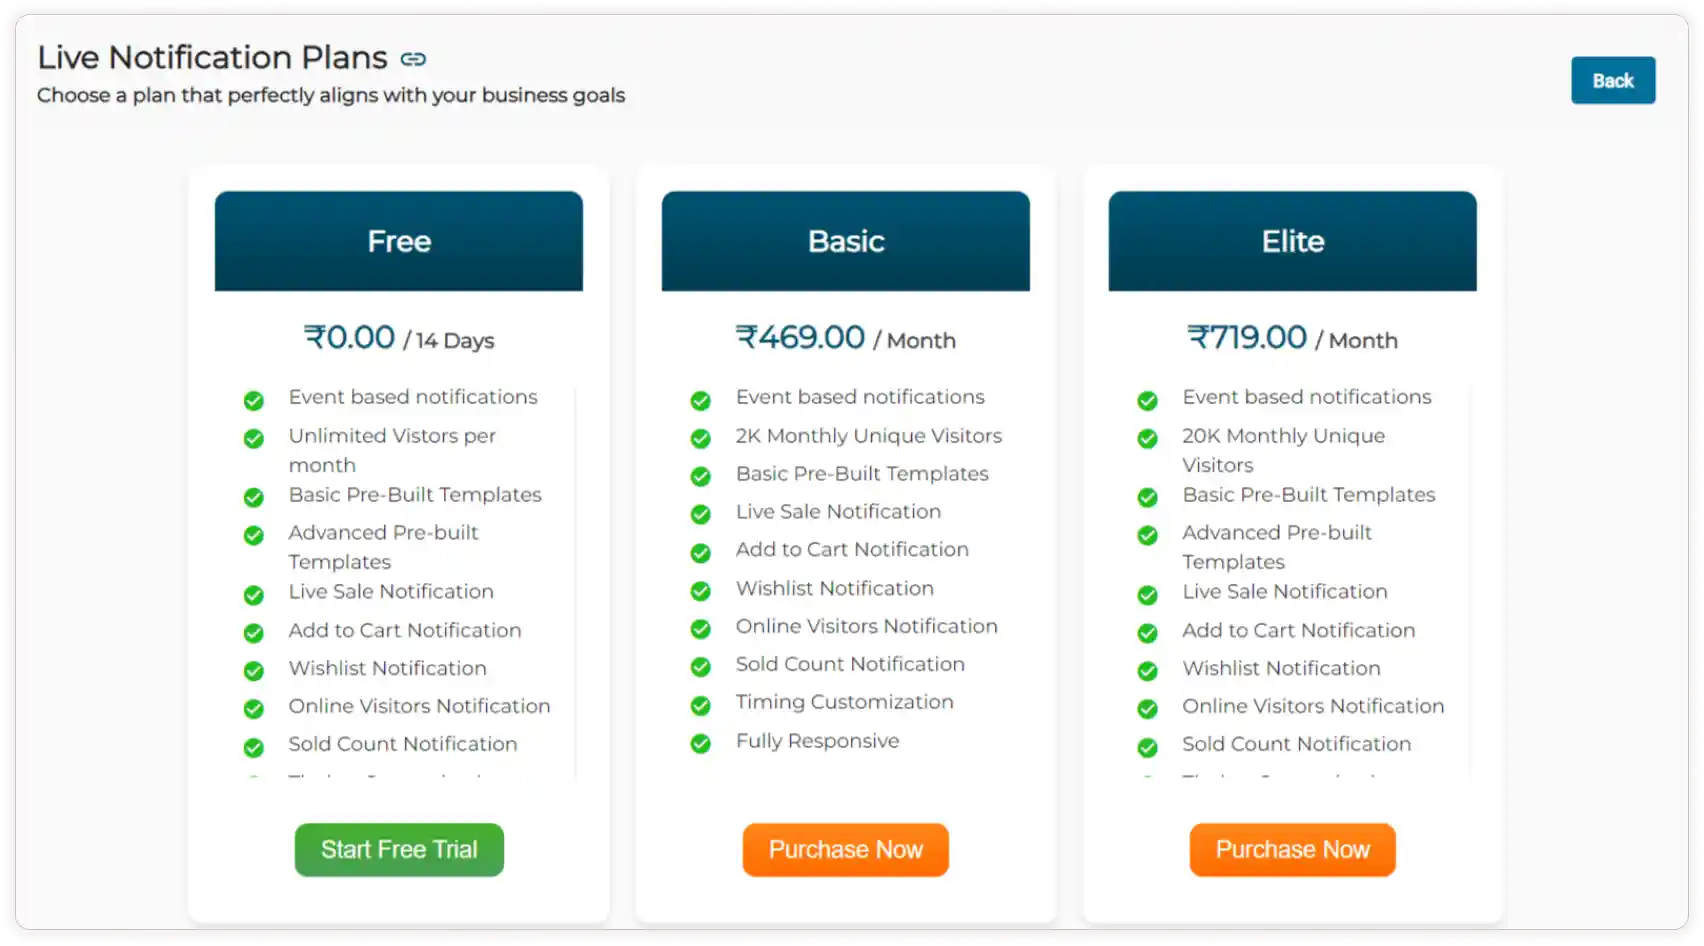
Select your preferred plan. In the plugin payment checkout page, make a payment successfully by clicking the Pay Now button. For more details on purchasing plugins. Click View
Note: After making a payment successfully, the Live Notification module will be added to the main menu automatically
-
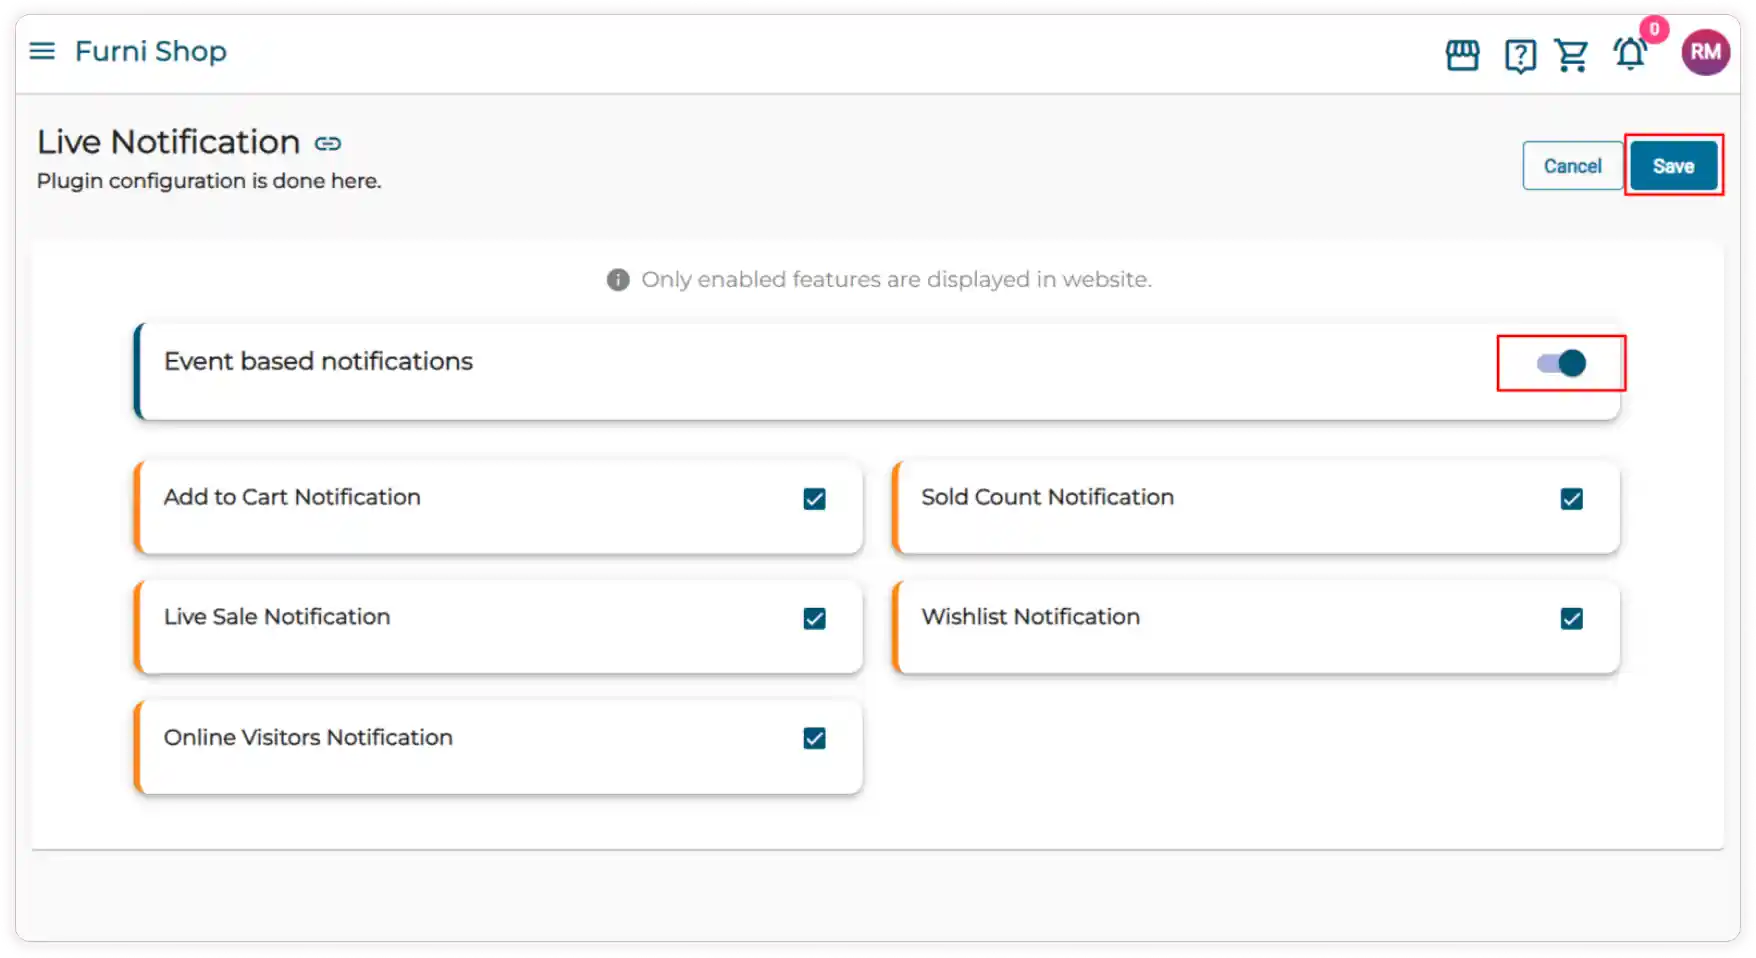
Enable the Event-based notifications toggle and select the checkboxes corresponding to the specific event-based notifications you want to enable for the live notifications module:
-
Add to Cart Notification
-
Sold Count Notification
-
Live Sale Notification
-
Wishlist Notification
-
Online Visitors Notification
-
-
Click the Save button to apply your configuration settings.
How to manage Live Notifications?
-
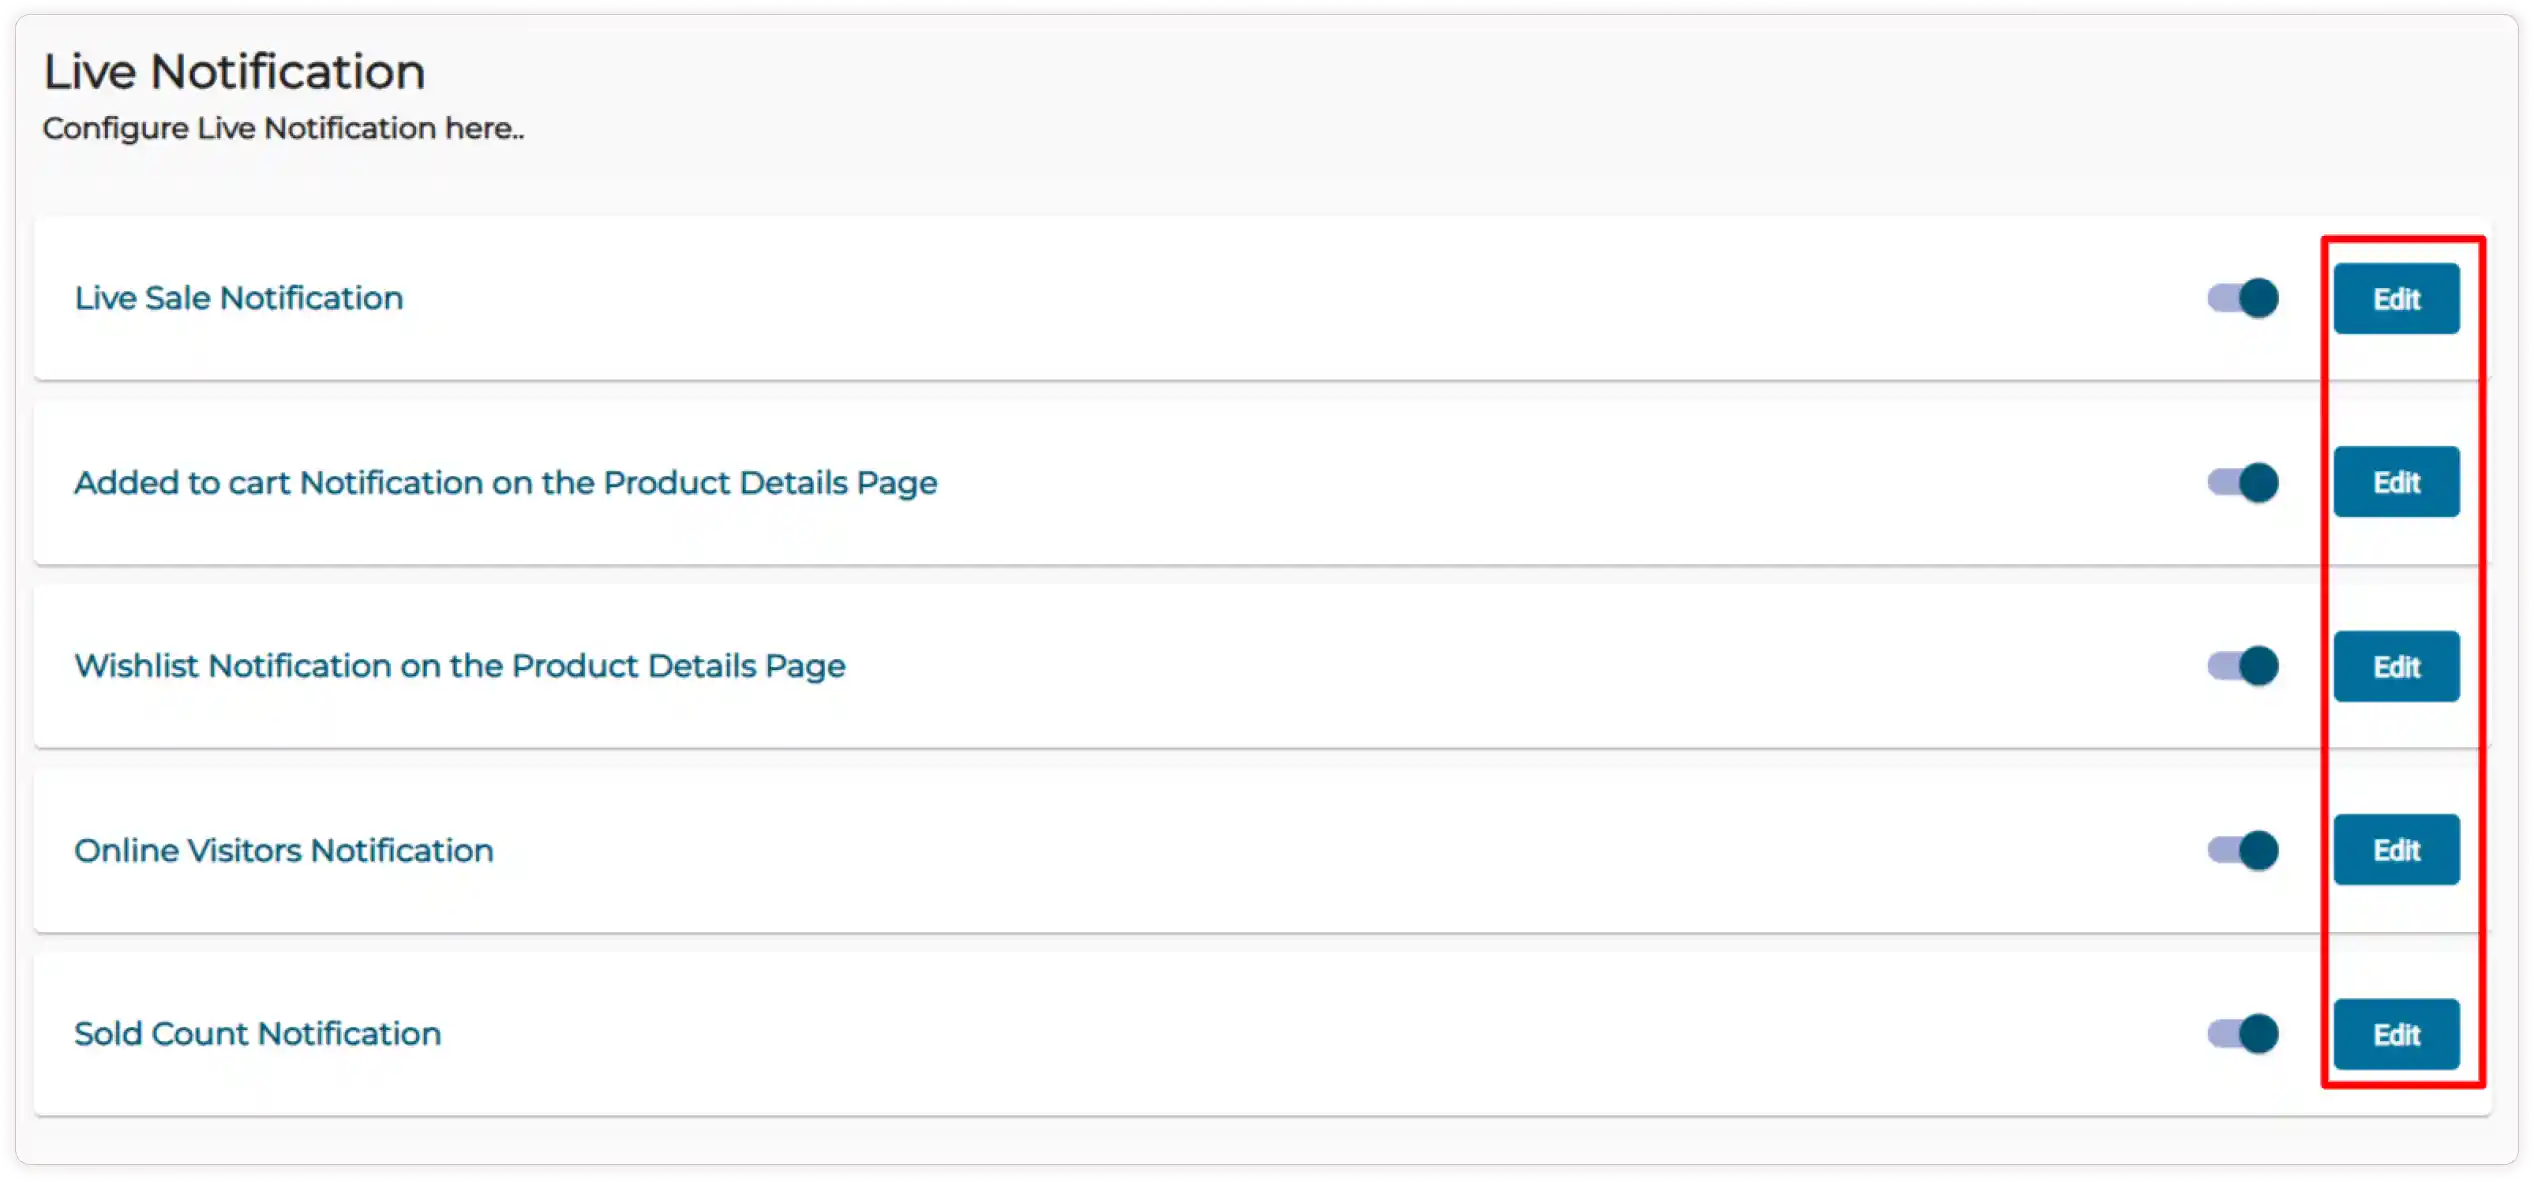
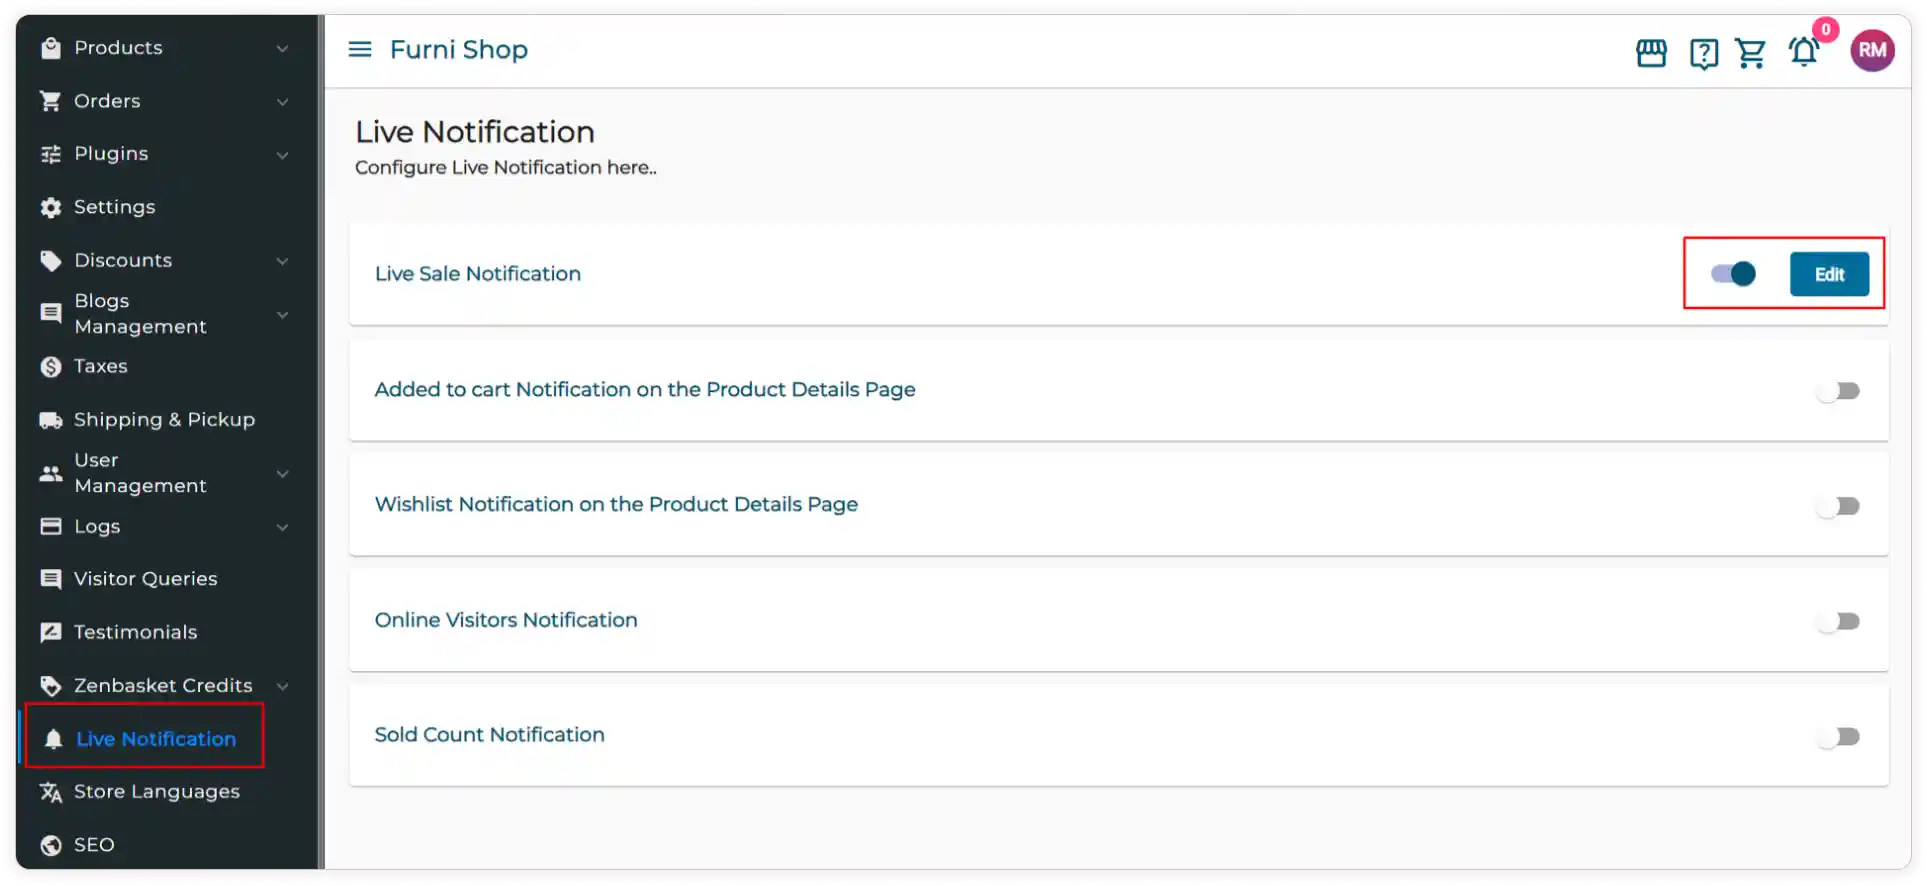
In the Live Notification module, you’ll have five customizable features that are already enabled in your plugins.
-
You can manage these features by enabling or disabling them.
Configuring Live Sale Notifications
-
To start using Live Sale Notifications, activate the feature and click the Edit button.
Note: Only delivered orders will be displayed in the live sale notification pop-up
-
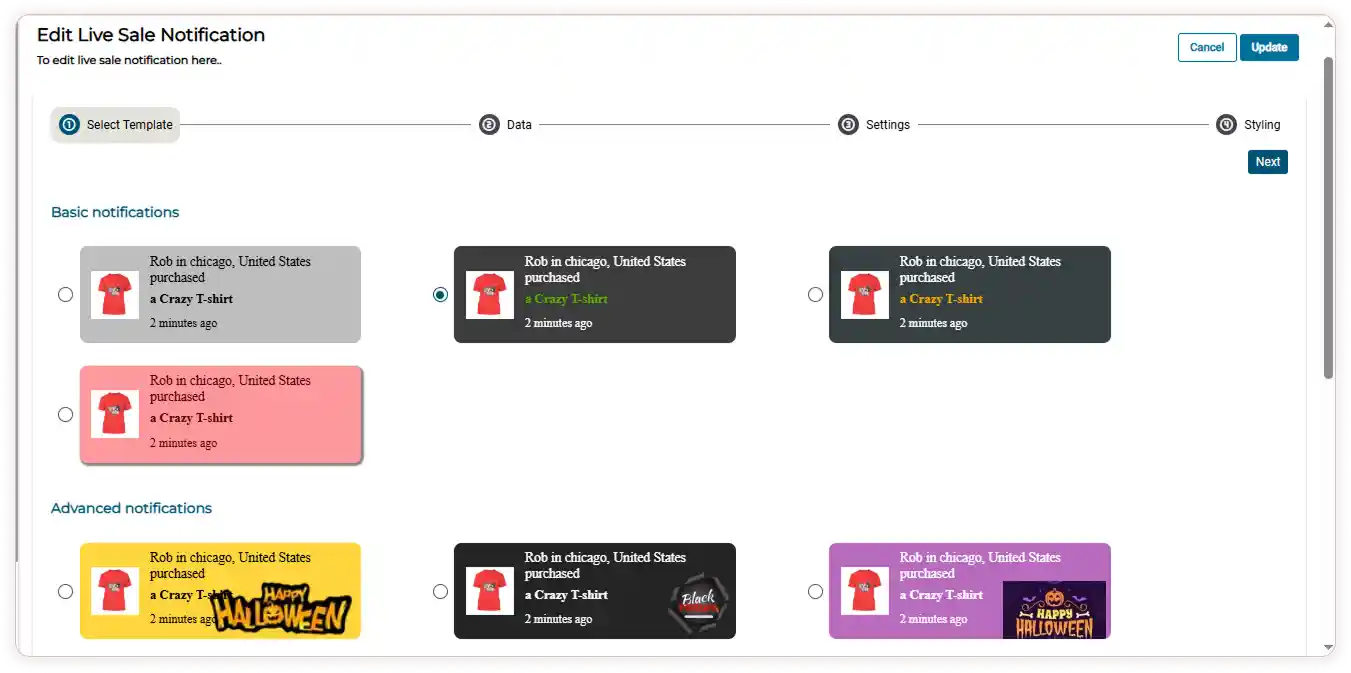
Choose the Template that best suits your needs from our Basic or Advanced templates, then click Next to proceed.
-
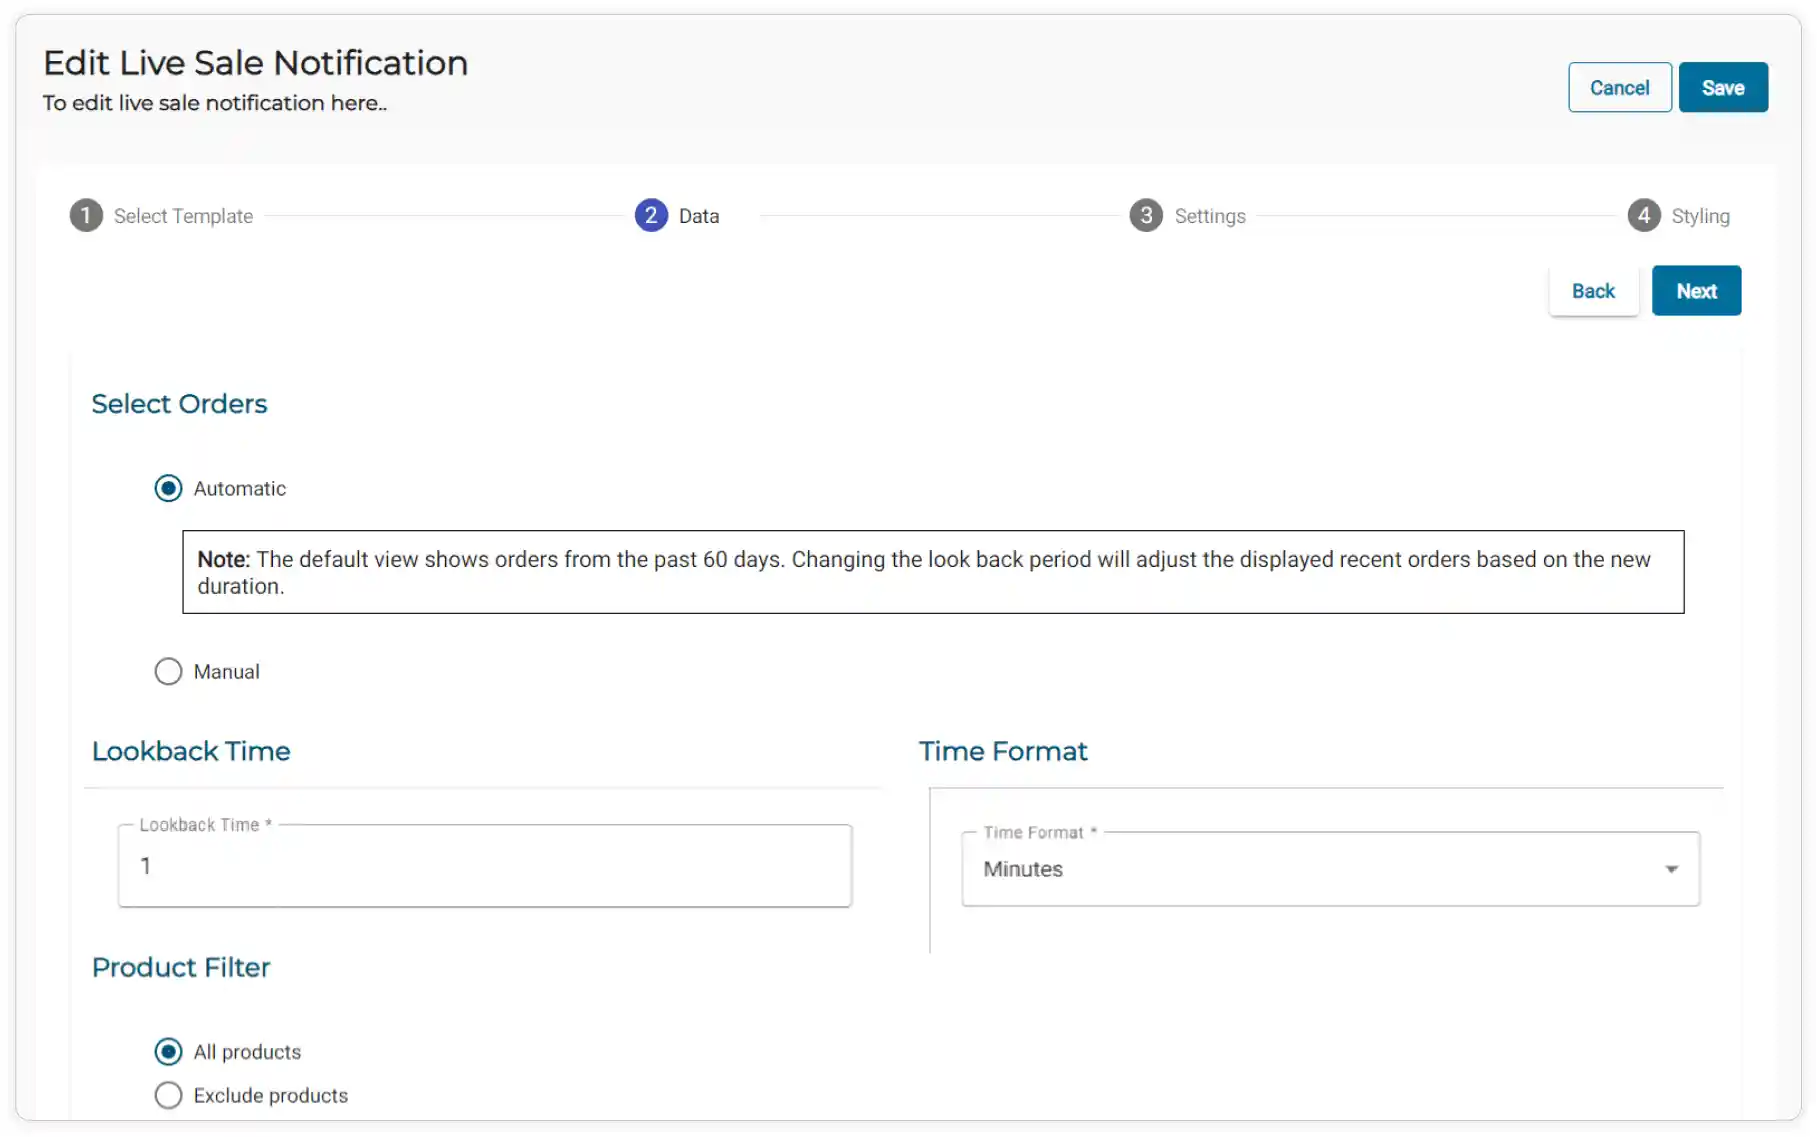
Choose ** Automatic or Manual** to display orders for Live Sale Notification
Note: Automatic: This option displays recent orders from the past 60 days. You can adjust the lookback period to show orders from a different timeframe.
Manual: Allows you to manually add details for live sale notifications. And generate notifications by combining the inputs.
#### If you select Automatic:
-
Set the Lookback time duration for which orders will be displayed (e.g., 1 minute ago, 5 minutes, 1 hour).
-
Use the dropdown menu to choose the desired Time format for displaying orders, such as minutes, hours, days, and months.
-
Select All Products to include all the products in your store.
To exclude specific products from the notifications, Choose Exclude Products, then select the products from the dropdown menu.
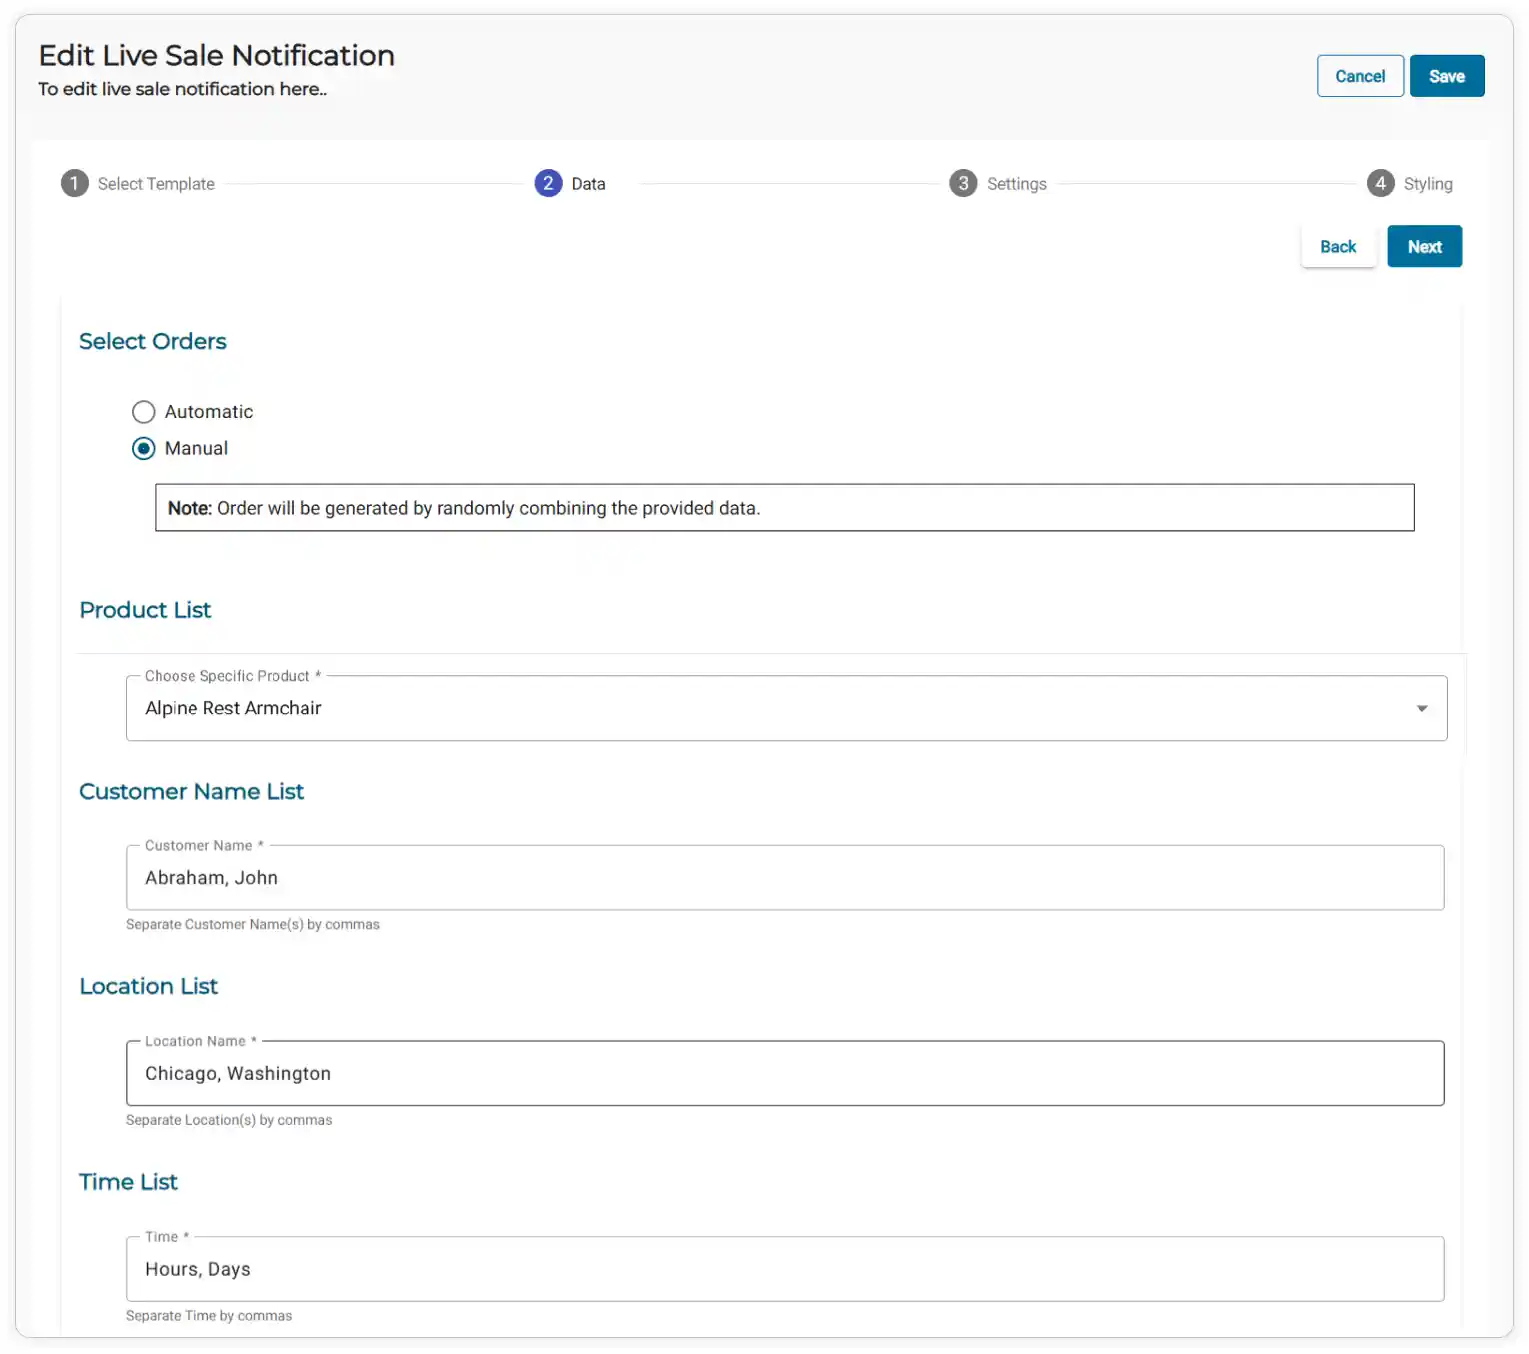
If you select Manual:
-
Choose a Specific Product from the dropdown product list menu.
-
Enter the Customer names, separated by commas (e.g., Nua, Rovan).
-
Enter the Customer’s location, separated by commas (e.g., Russia, Canada).
Note: You can enter any name and location in the input fields.
- Enter the Prefix of the time format, since ago is a default suffix for displaying time (e.g., 2:00 mins, 3 Hours). No need to include ago in the input.
-
-
Click Next to proceed to the settings section
-
You can customize the content as needed but cannot change the variables.
For example, you can modify “{customer_Data} in {location} purchased a {product_Data} to A {product_Data} was purchased by {customer_Data} in {location}”
-
You can rearrange or remove the variables as needed. (eg., {time} and {format}have been removed)
-
To add removed variables, copy the {time} and {format} variables and paste them in the designated box
-
Click the Reset button to undo all changes.

-
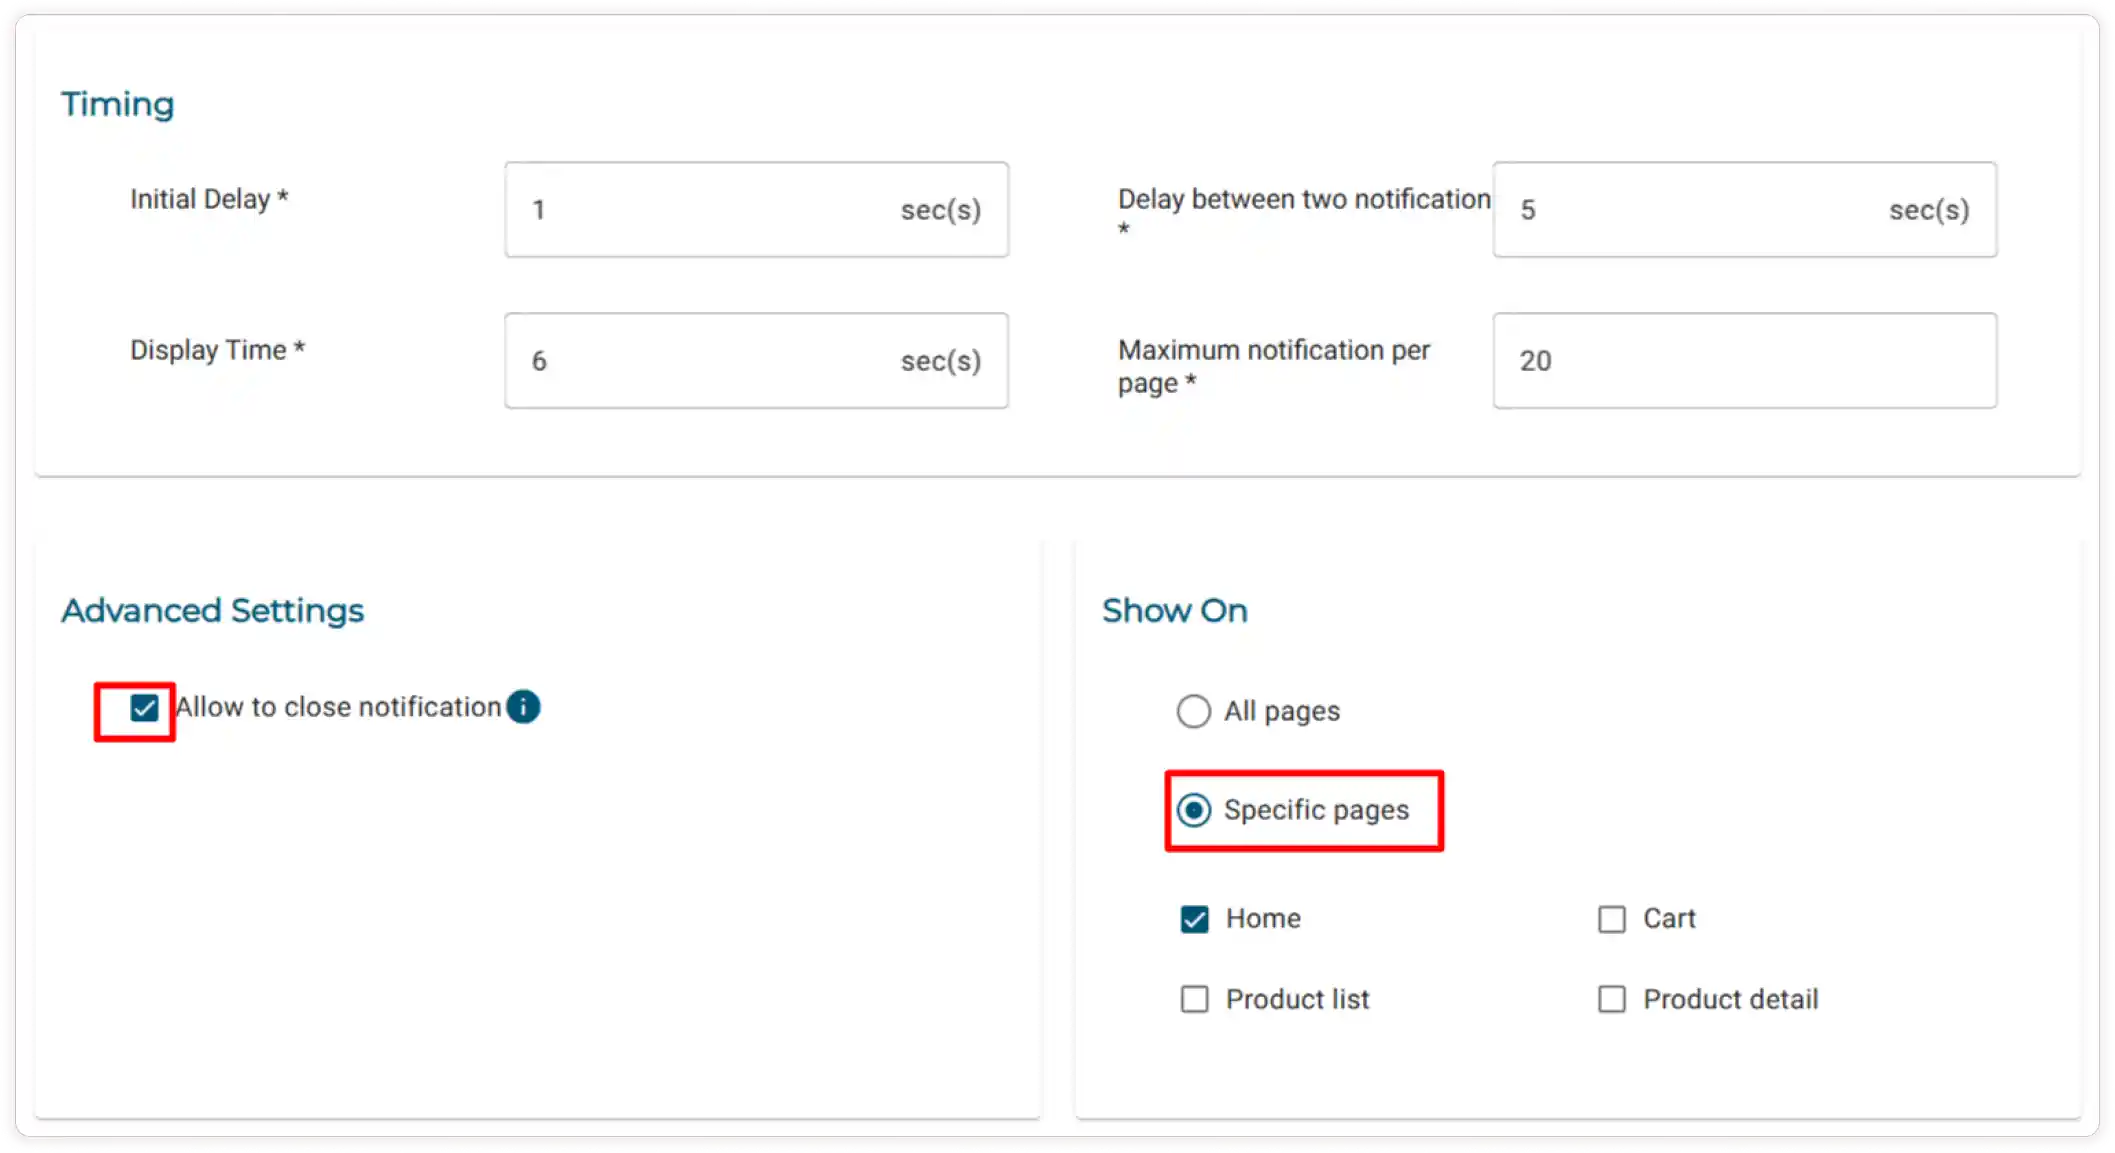
Enter the number of seconds you want to Delay the initial notification.
-
Specify the desired Display duration for notifications in seconds.
-
Enter the desired Interval between notifications in seconds.
-
Set the maximum number of notifications allowed per page.
-
To allow the user to close the notification. Check the Allow to close notification box
Note If a customer closes a notification by clicking the close icon, it will go away for a while but will show up again when they come back from another page.
-
To display notifications on all pages, select All Pages. If you prefer to show notifications only on certain pages, select Specific Pages and check the boxes for the pages you want to include.
-
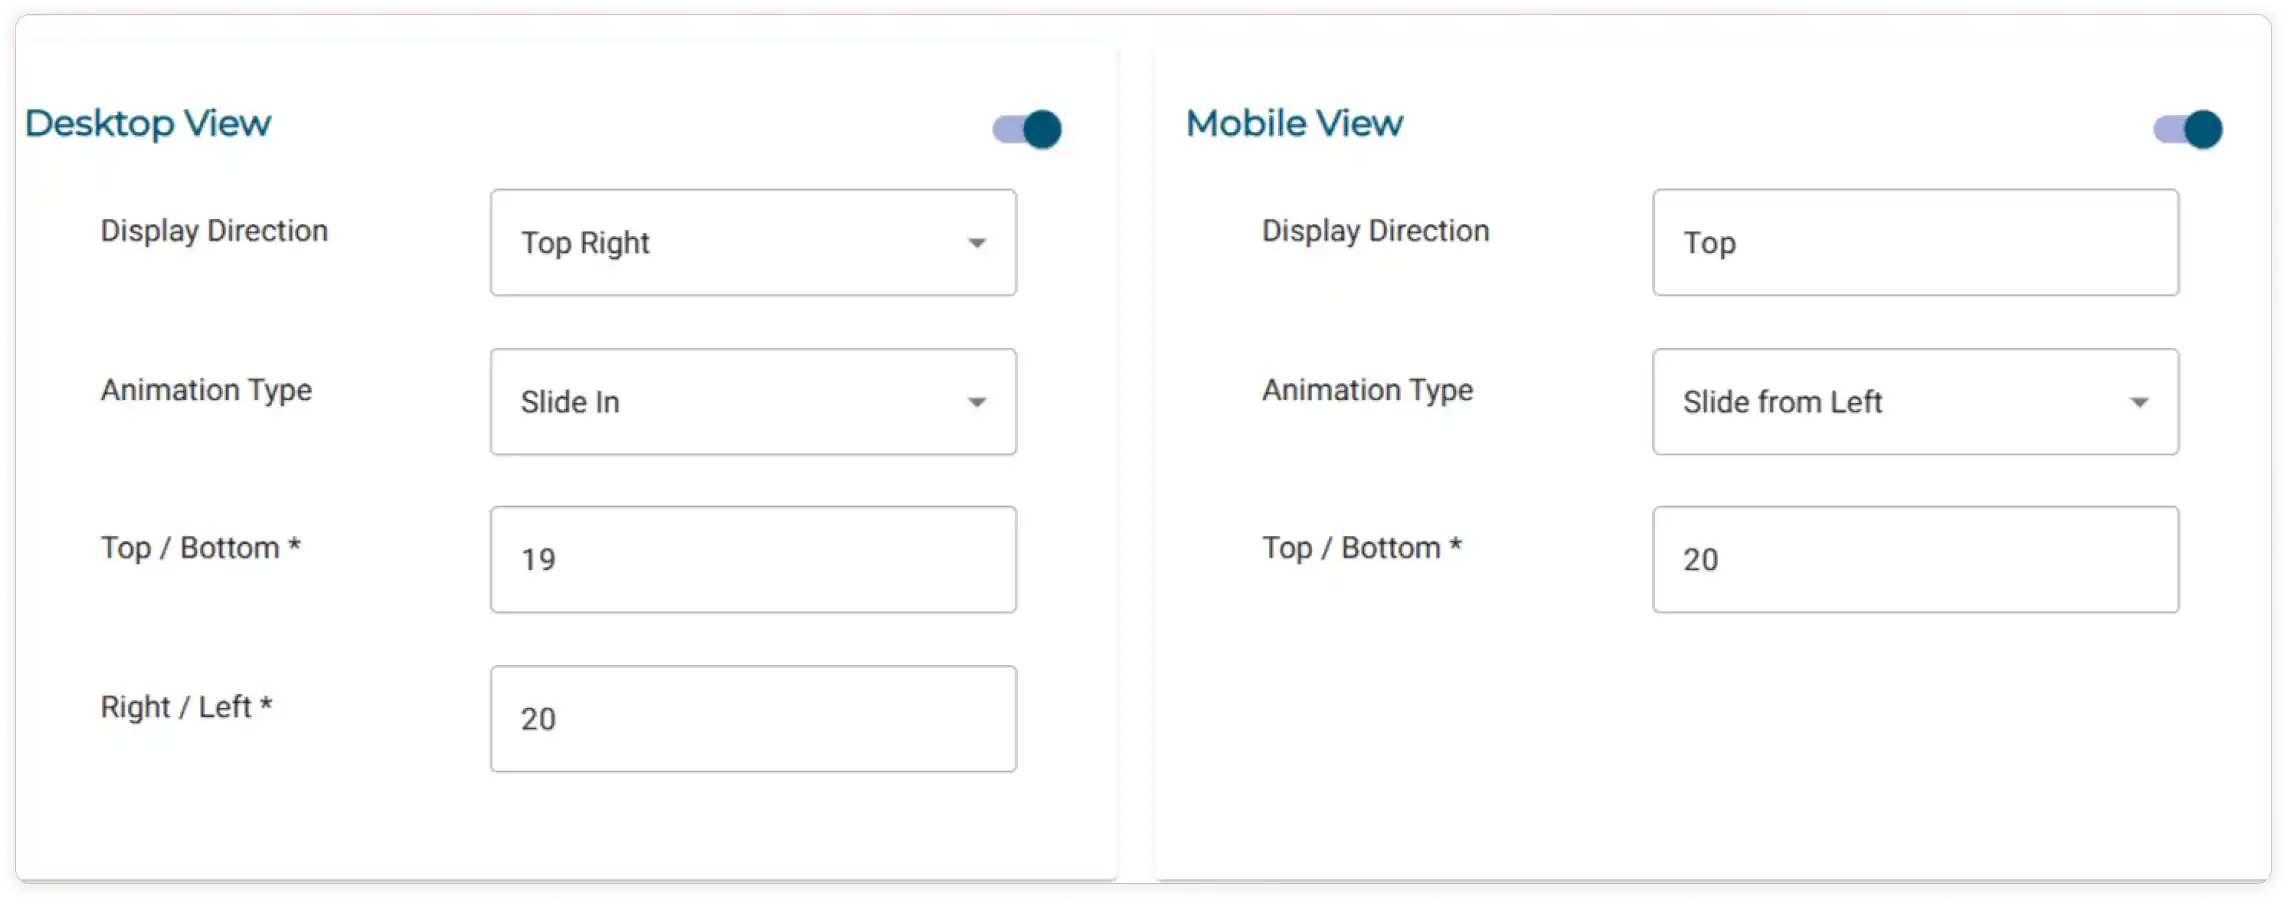
Enable the toggle button for Desktop View and Mobile View Settings
-
Choose the Display Direction and Animation type by using the dropdown menu for both Desktop and Mobile View.
Note The display direction cannot be chosen for mobile view, as Top is the default setting.
-
Adjust the values for the Top/Bottom and Right/Left margins in the desktop view.
-
Modify the values for the Top/Bottom margins in the mobile view to increase or decrease them.
-
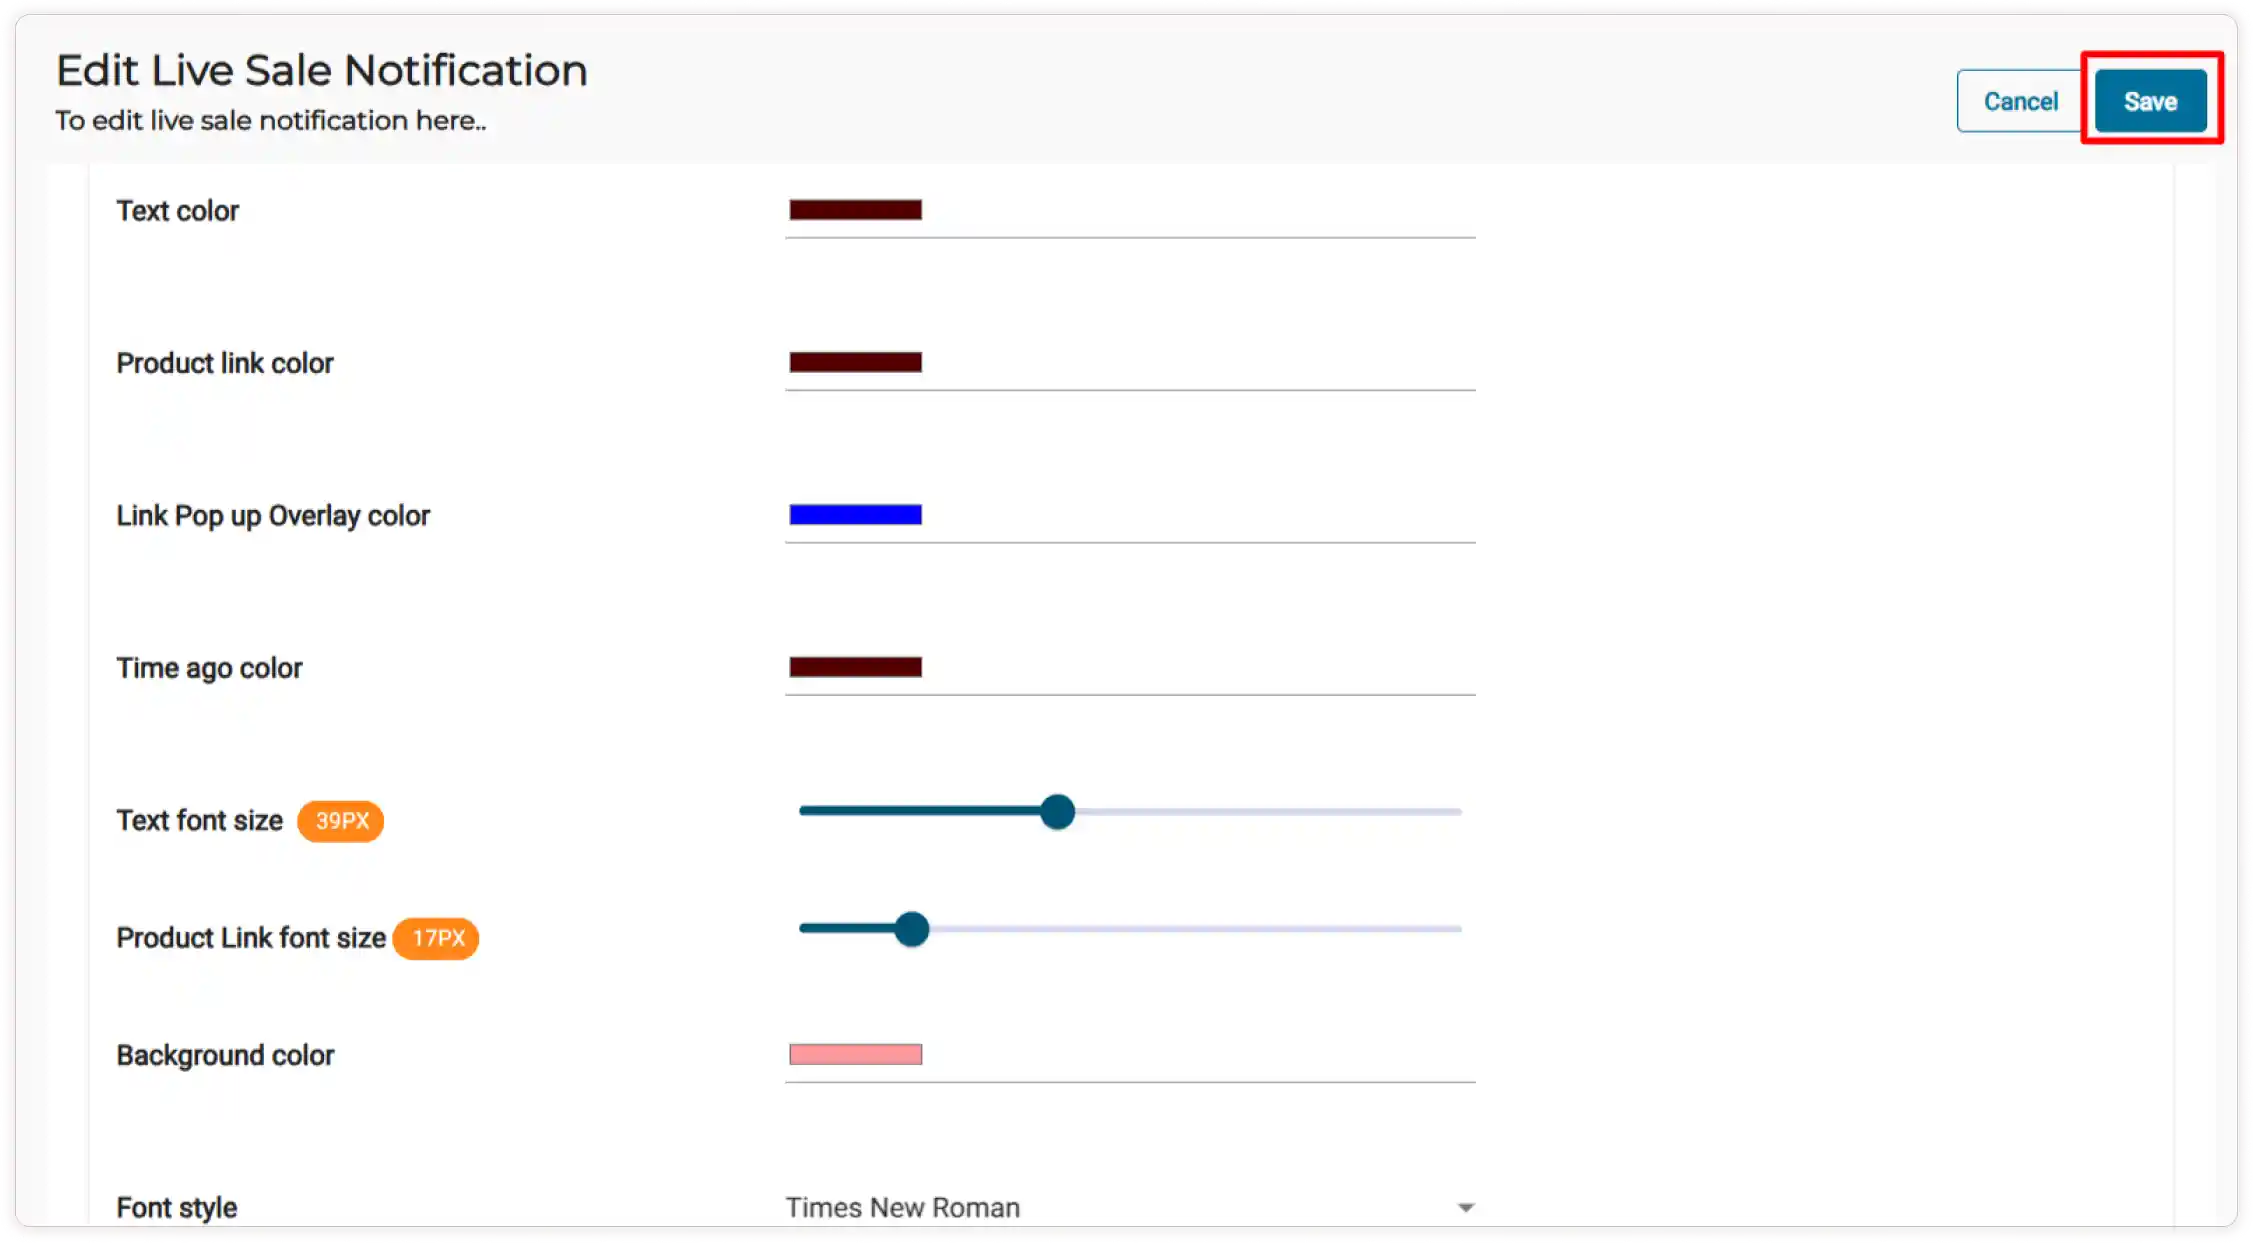
Click Next to proceed to the Styling section.
-
Use the color picker to change the color of Text Color, Product Link Color, Link Popup Overlay Color, and Time Ago Color.
-
Adjust the slider to resize the Text font size and Product Link font size.
-
Change the Background color of the notification template by using the color picker.
-
Choose the desired font style from the dropdown menu.
-
Finally, click the Save button to configure the Live Sale Notifications.
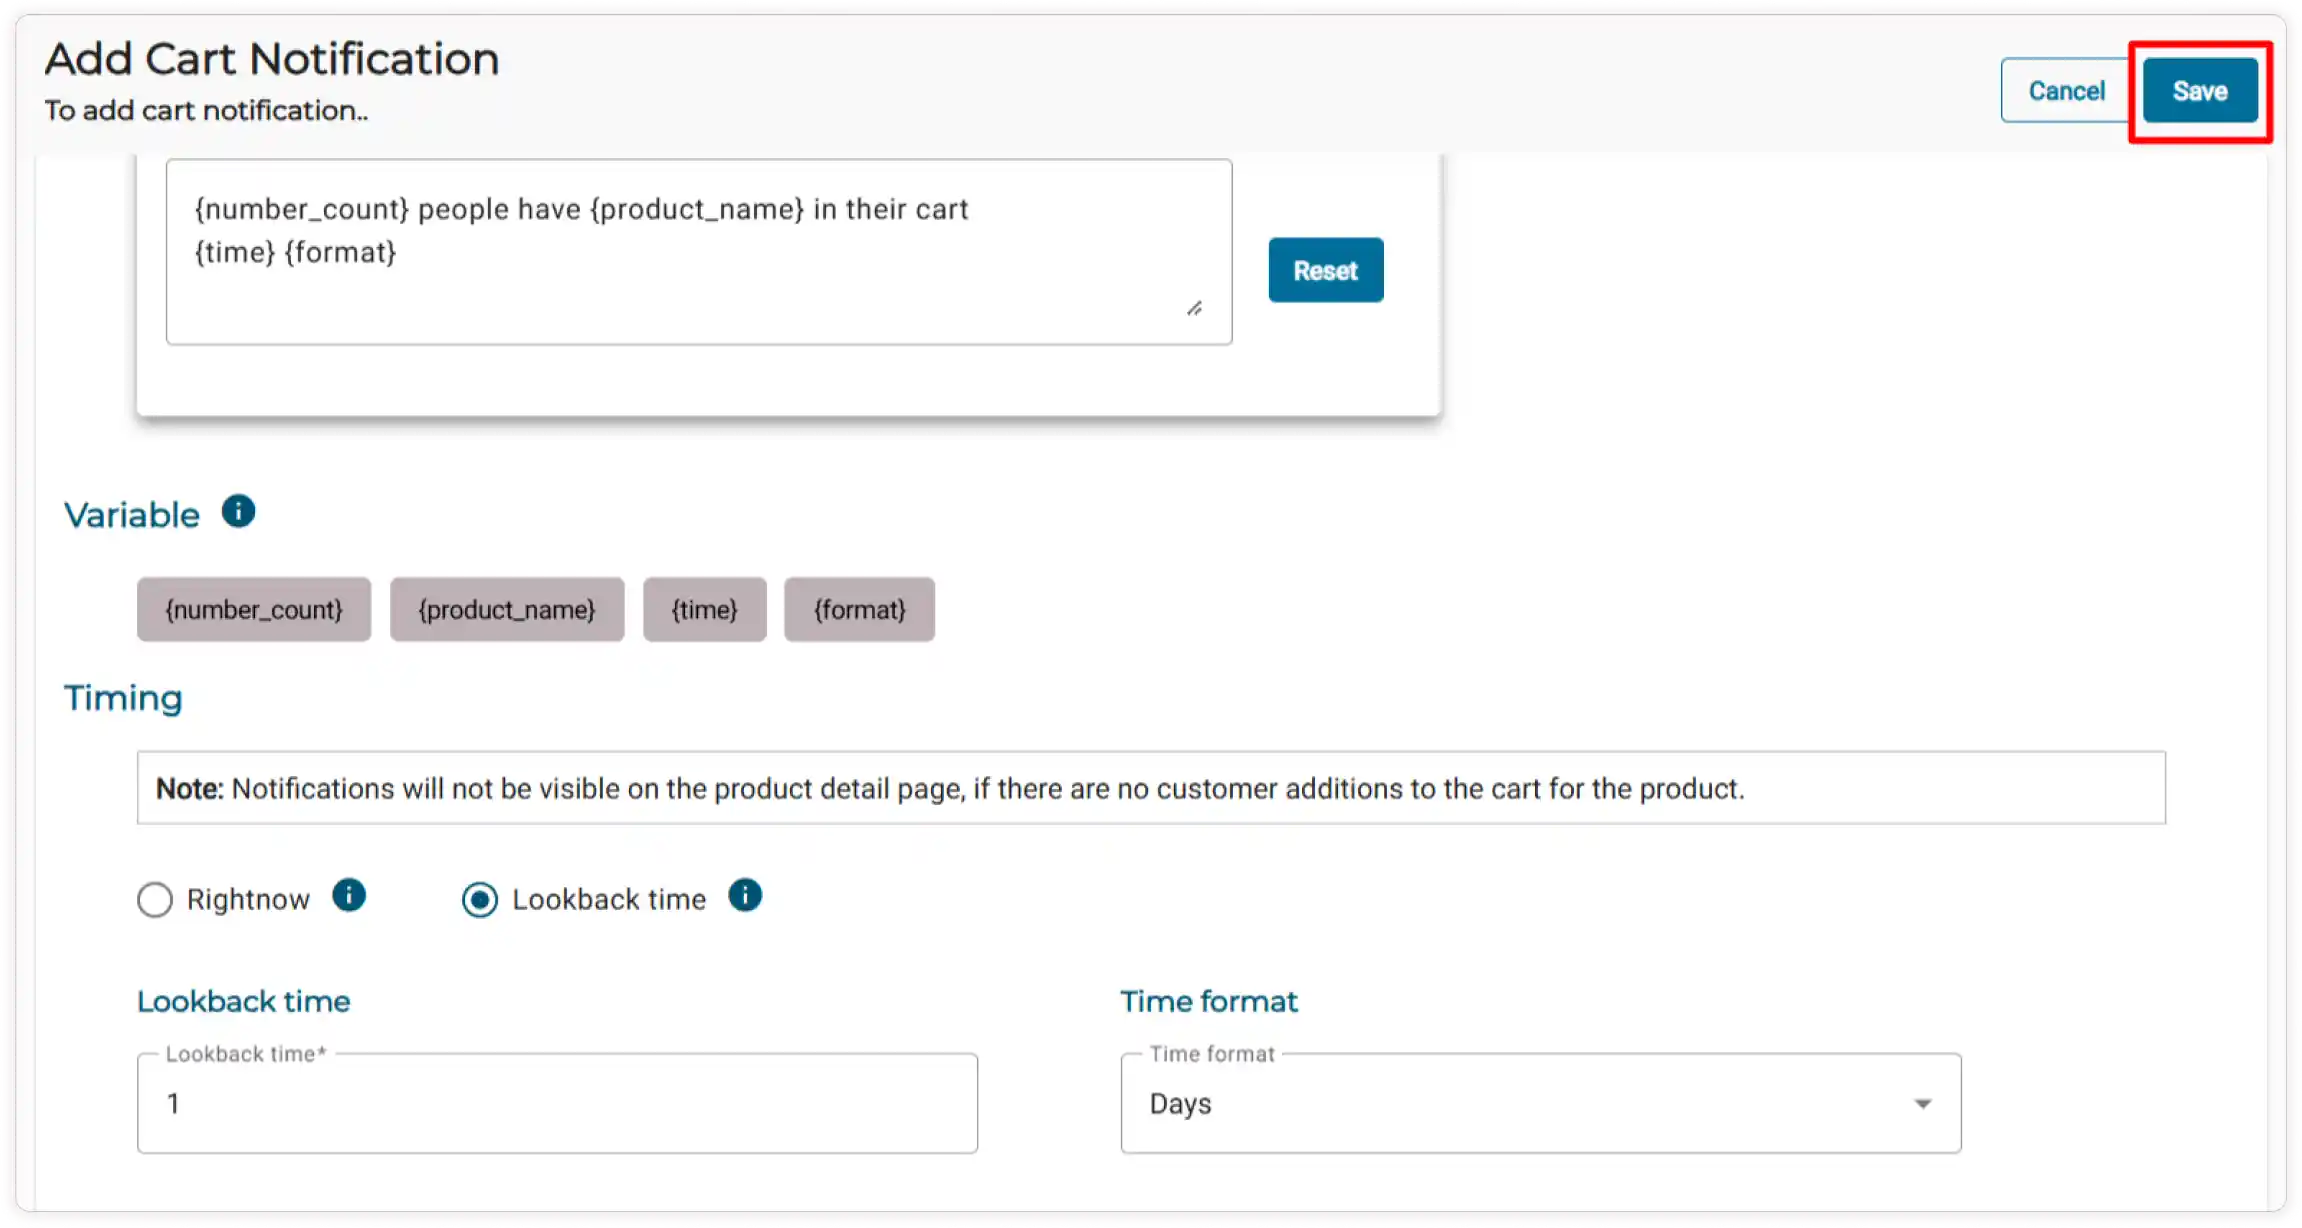
How to Configure the ‘Added to Cart’ Notification on the Product Details Page
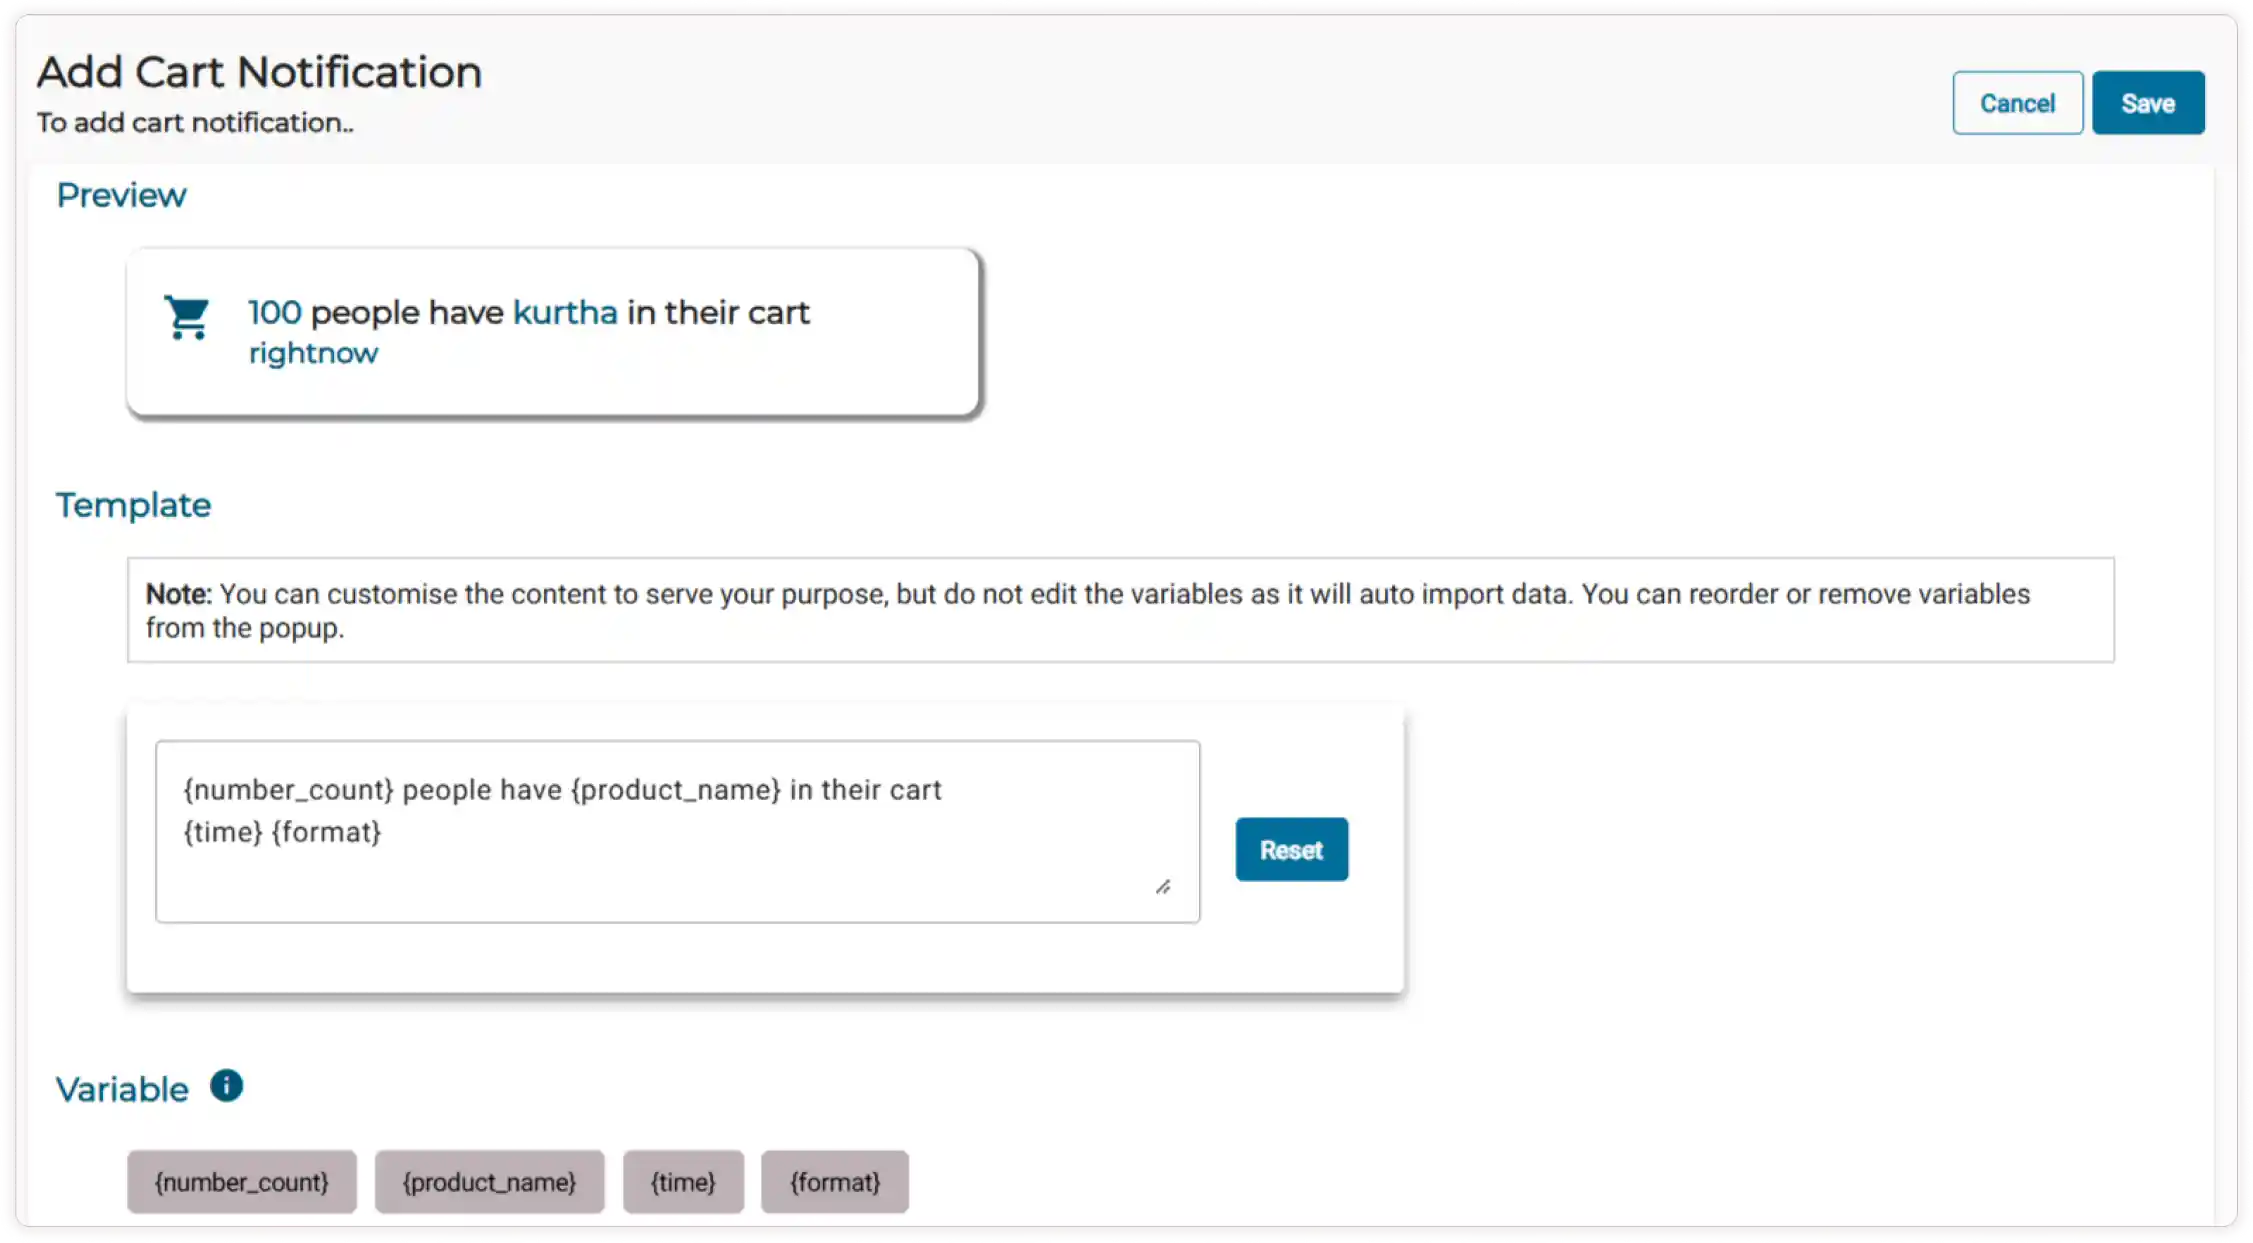
In the Live Notification module, enable the Added to Cart Notification on the Product Details Page feature.
Note You can customize the content to meet your needs, but you cannot modify the variables; you can only remove or rearrange them.
-
If you want to add the removed variables, you can do so only by copying and pasting from the provided variable list.
-
To clear your changes, simply click the ** Reset** button.
-
Choose either Right Now or Lookback:
Note
- Right Now: This option displays the notification for the entire session, from the beginning up to the current cart update for the specific product.
- Lookback: This option shows the notification based on the specified lookback time.
If you choose to Look back time,
-
Set the Lookback time for displaying the added cart counts by increasing or decreasing the duration (e.g., 1 minute ago, 5 minutes, 1 hour).
-
Use the dropdown menu to select your desired Time format for showing cart counts, such as minutes, hours, days, or months
-
You can Preview the Added to Cart Notifications after customization at the top of the page.
-
Then, click the Save button to configure the added-to-cart notification successfully.
Note The Added to Cart Notification will automatically update the cart count each time a product is added to the cart in your store.
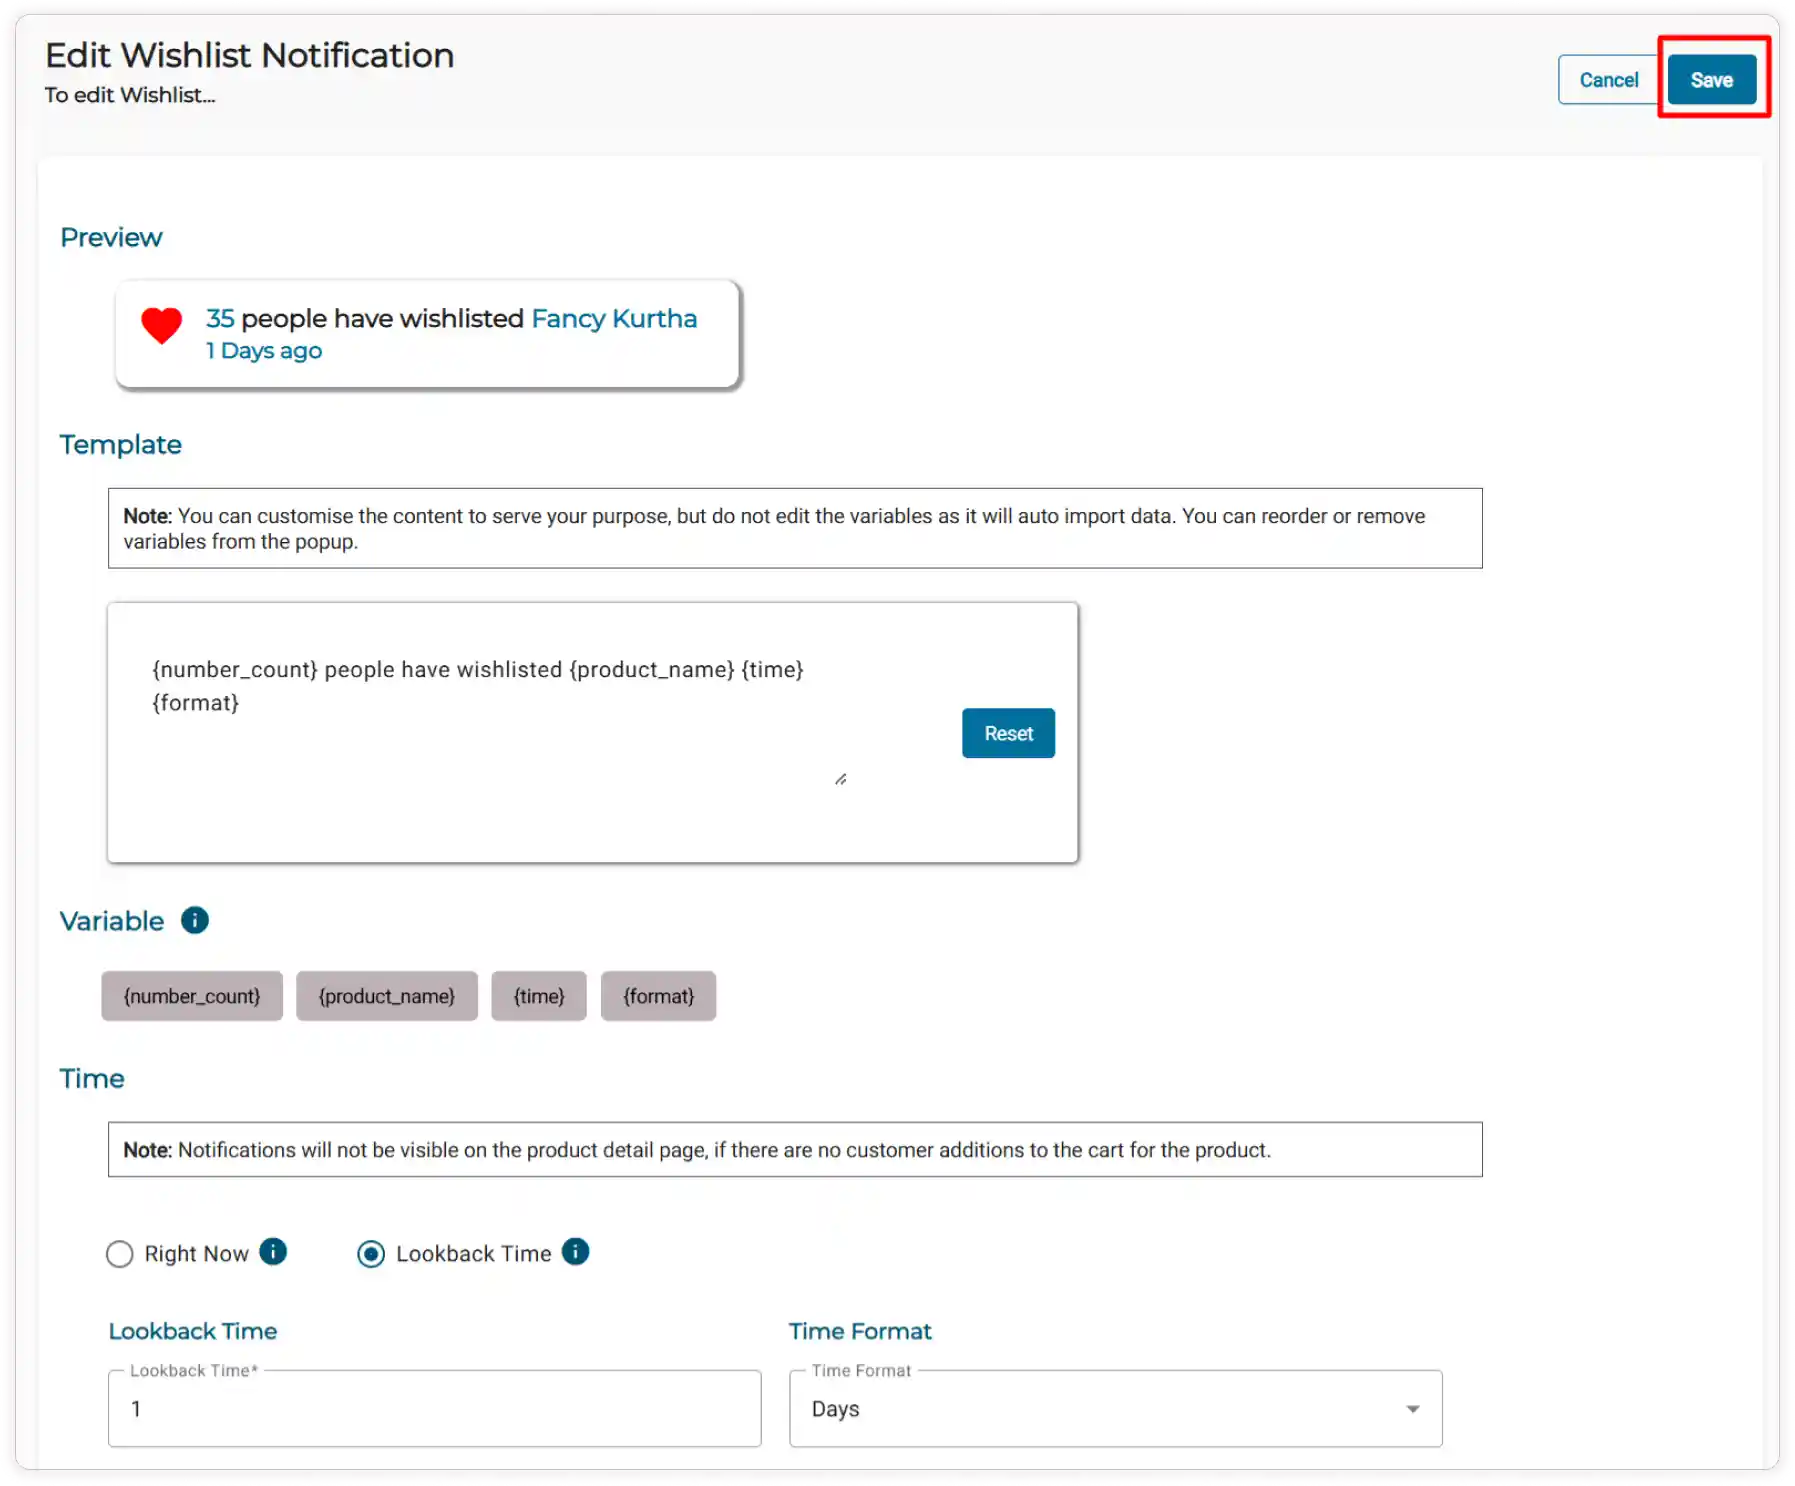
How to configure the Wishlist Notification on the Product Details Page?
-
In the Live Notification module, enable the Wishlist Notification on the Product Details Page feature.
Note: You can customize the content to fit your needs, but you cannot change the variables; you may only rearrange or remove them.
-
To add removed variables, copy and paste from the provided variable list.
-
Click the Reset button to clear all changes.
-
Select either Right Now or Lookback;
-
Right Now: Shows the notification for the entire session, from the start to the latest wishlist update for the specific product.
-
Lookback: Displays the notification based on a set lookback period.
If you select Lookback time,
-
Adjust the lookback time by setting the duration (e.g., 1 minute ago, 5 minutes, 1 hour)
-
Select your preferred time format (minutes, hours, days, or months) from the dropdown.
-
-
You can Preview your Wishlist Notifications customized template at the top of the page.
-
Click Save to apply your settings.
Note: The Wishlist Notification automatically updates each time a product is added to the wishlist in your store.
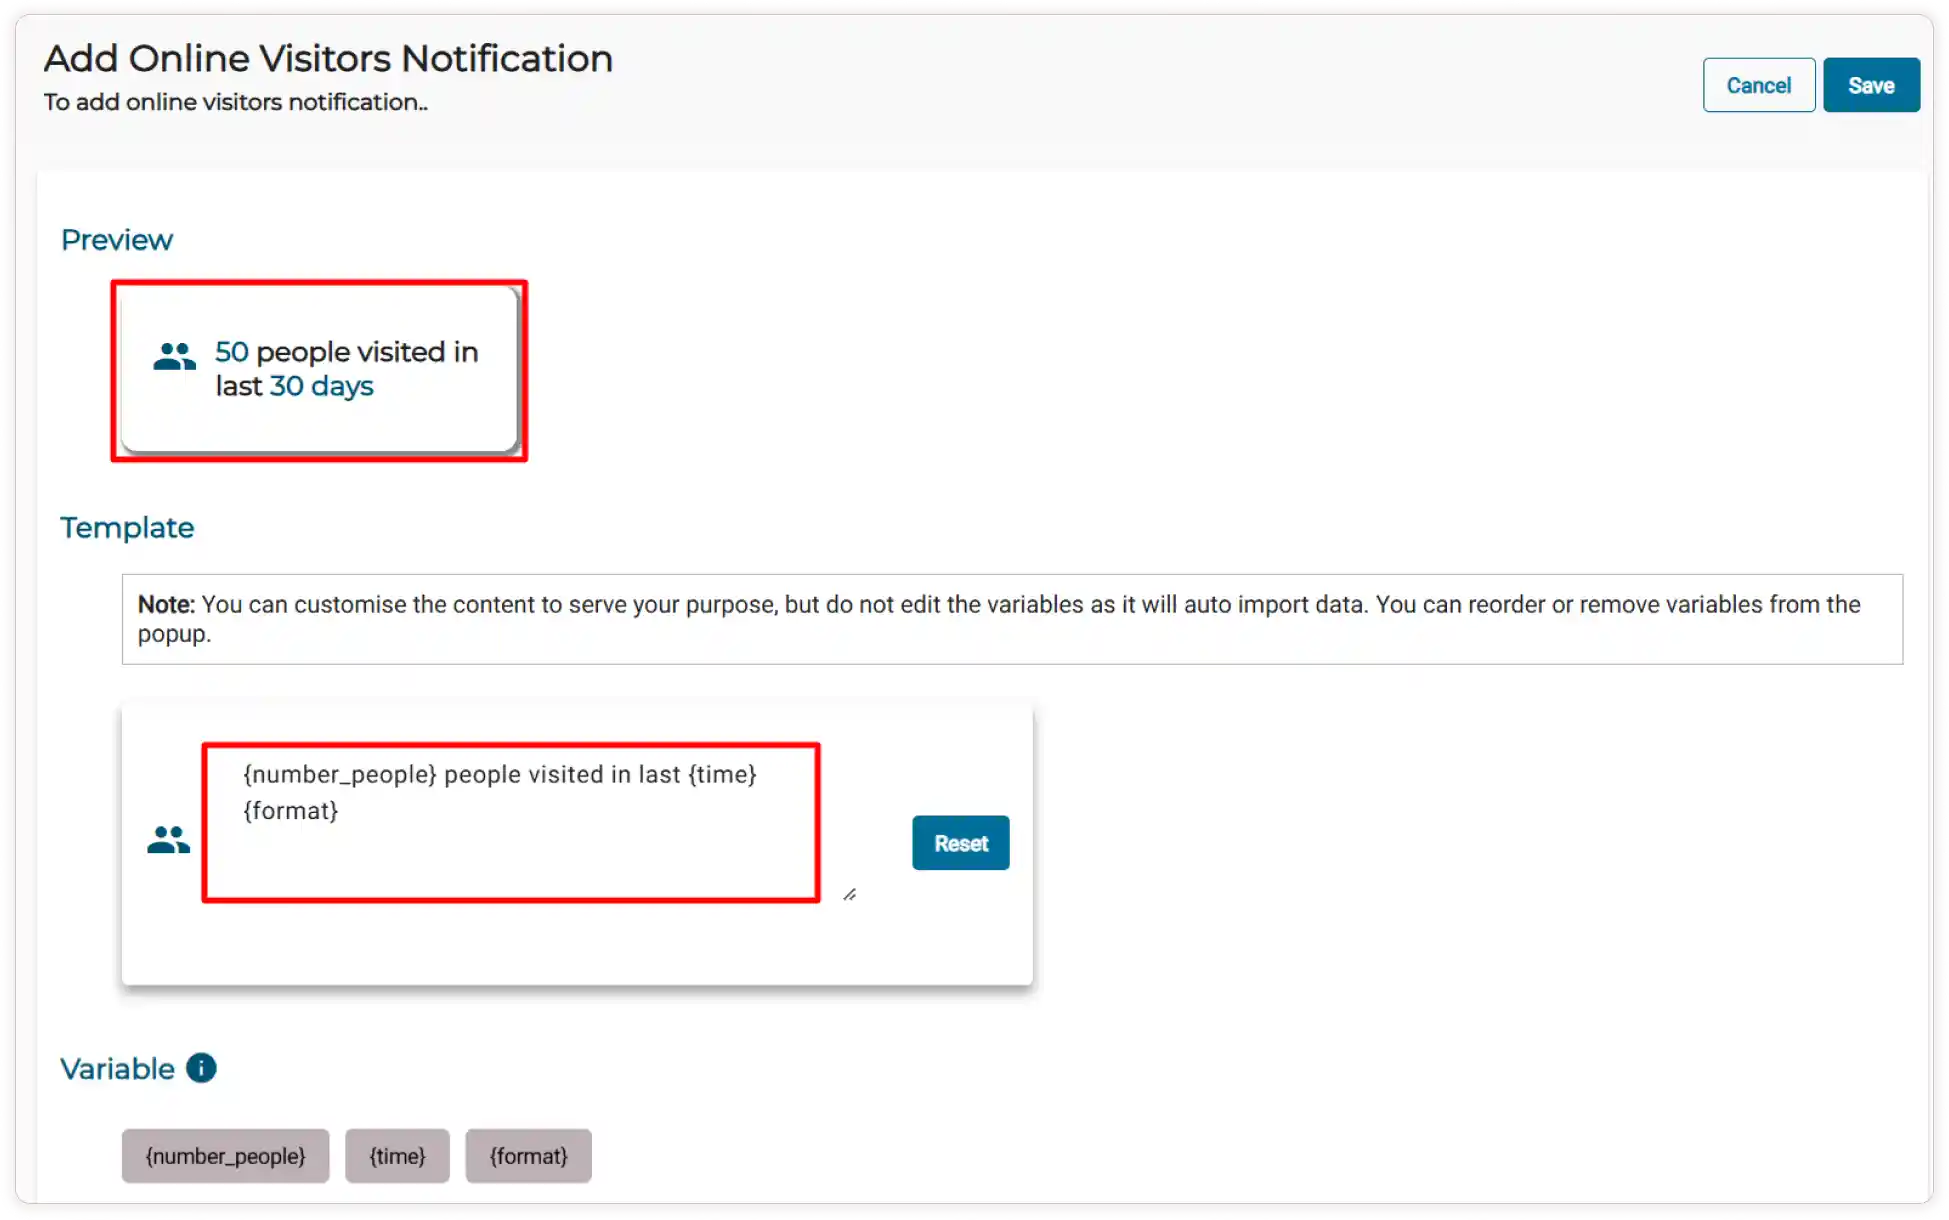
How to Configure Online Visitors Notification?
-
In the Live Notification module, enable the toggle for the Online Visitors Notification feature.
-
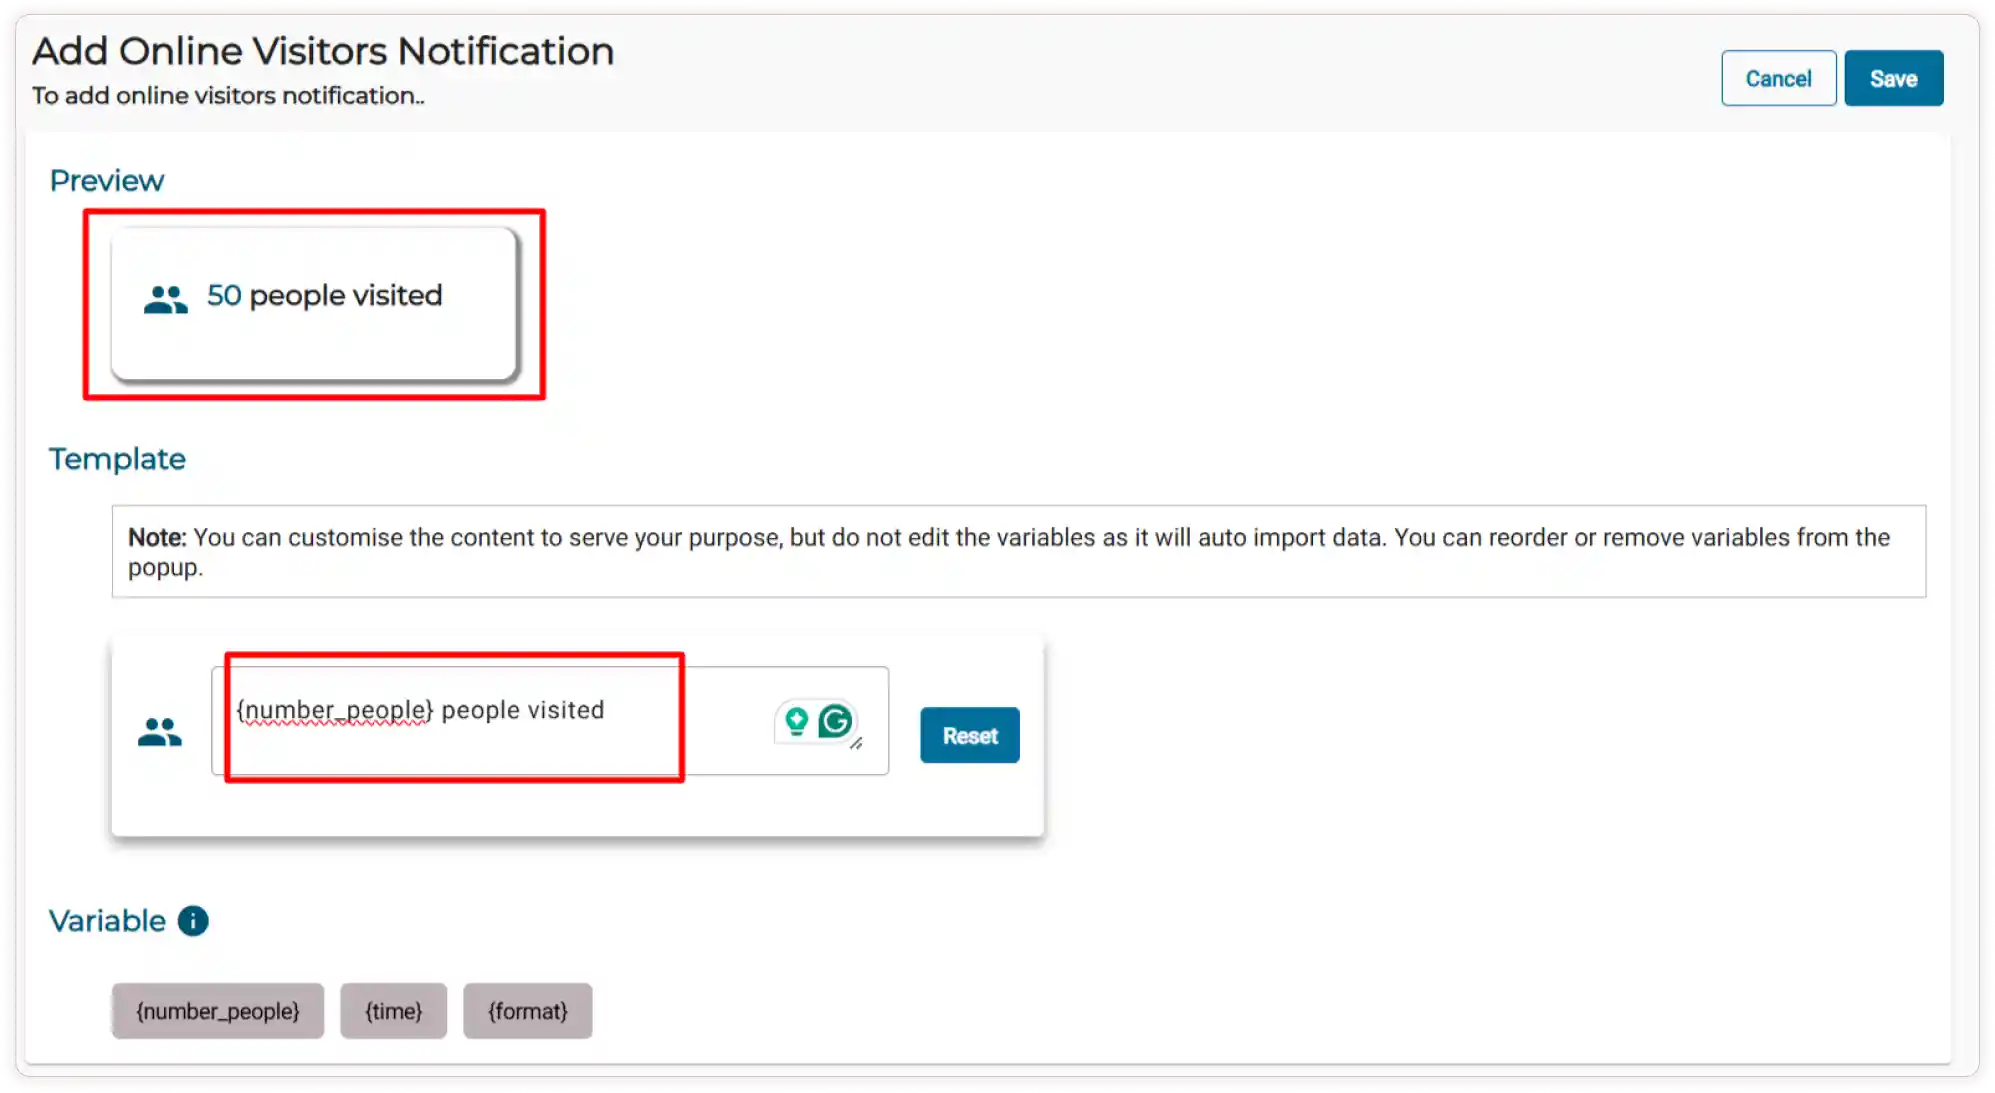
You can customize the content as needed, but you cannot change the variables. For example, you can modify “50 people visited in the last 30 days” to “In the last 30 days, 50 people visited.”
-
You can rearrange or remove the variables as needed. (eg., {time} and {format}have been removed)
- To add removed variables, copy and paste them from the provided variable list.
-
Click the Reset button to undo all changes.
-
To select a display method for online visitor notifications, select Automatic method;
Note: Ensure that the Google Analytics plugin is activated, as the automatic display method retrieves online visitor data directly from Google Analytics.
-
Set the lookback time from which to display online visitors (e.g., 1 minute ago, 5 minutes ago, 1 hour ago).
-
Use the dropdown menu to select how to display the time for online visitors, such as in minutes, hours, days, or months.

-
-
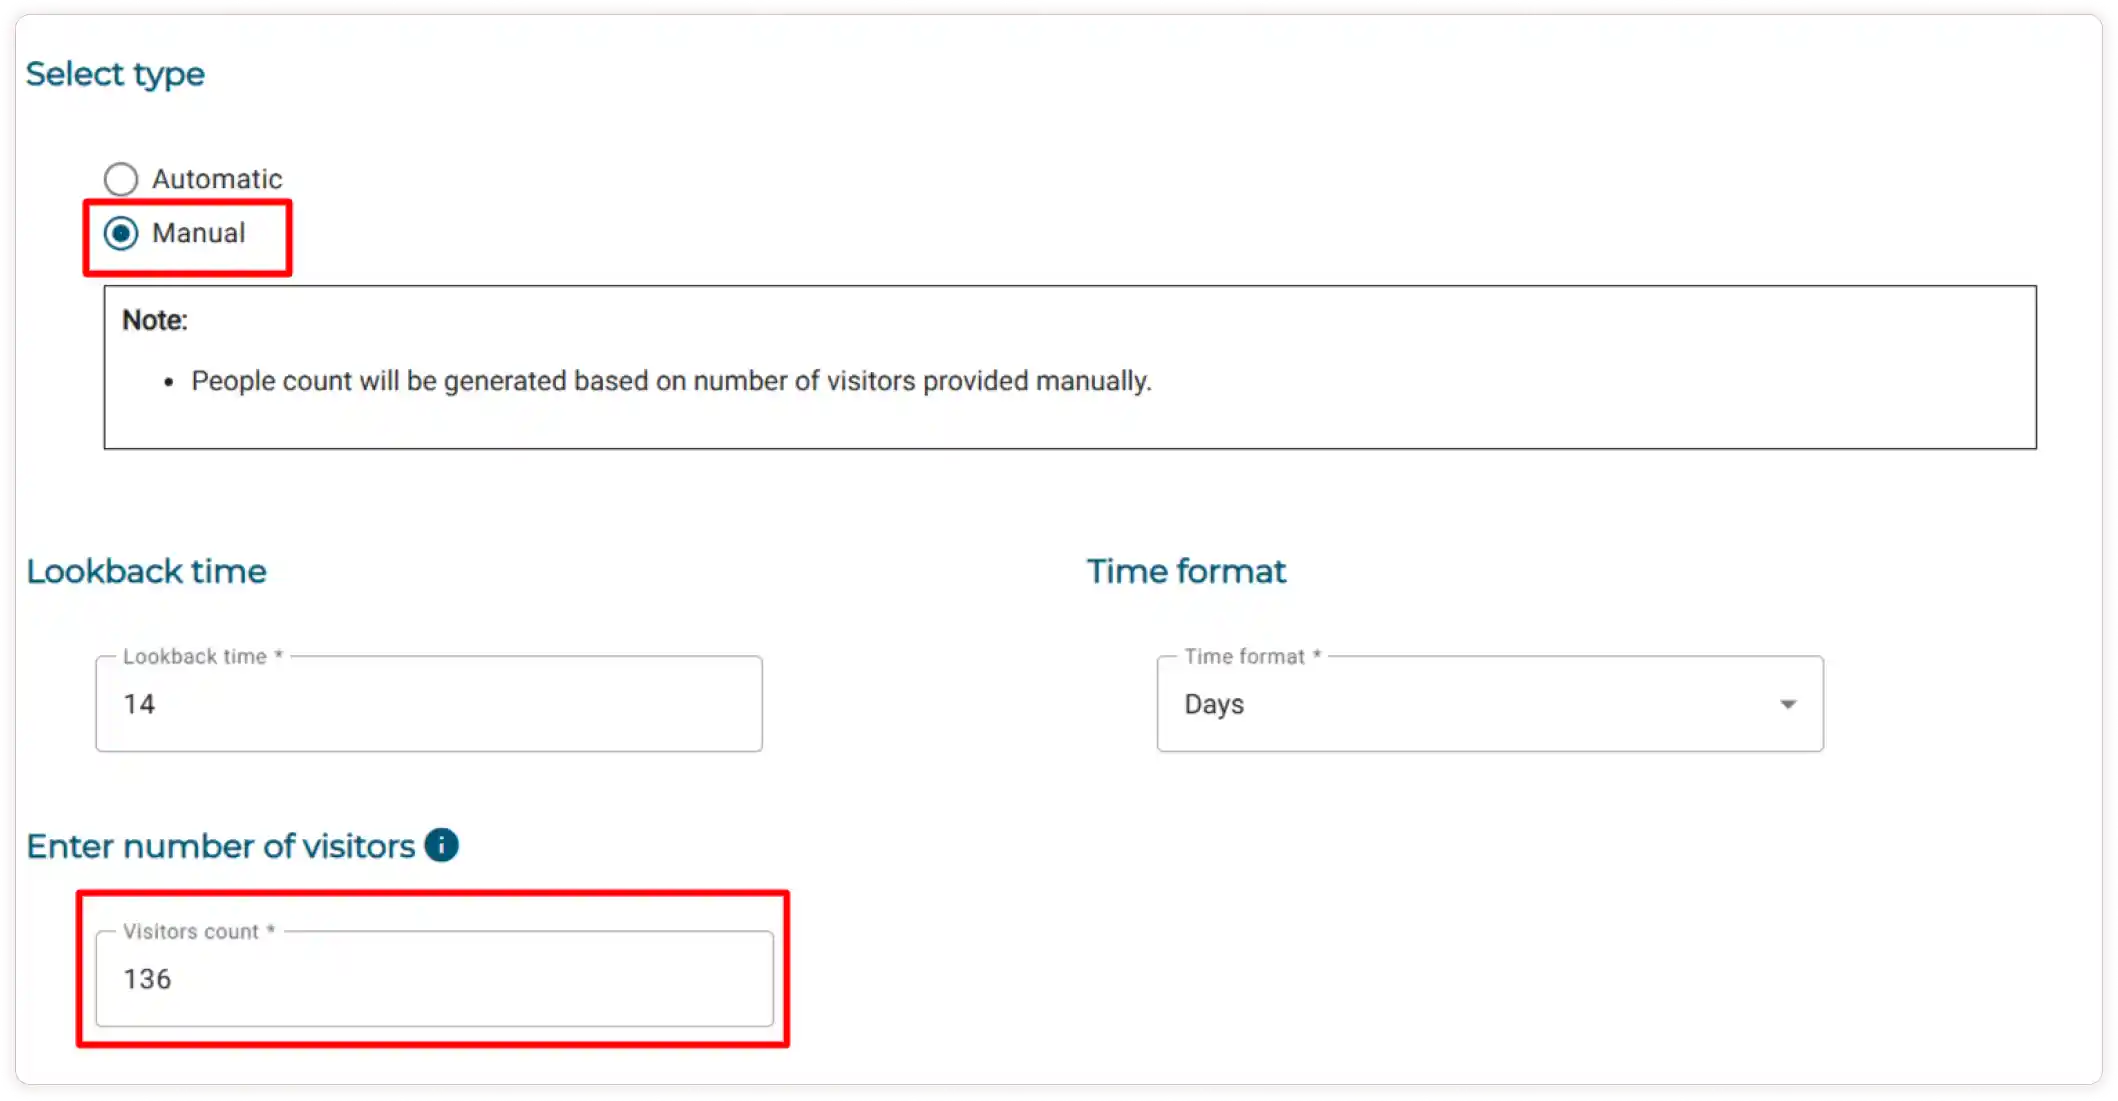
Select the Manual method,
- You can increase or decrease the lookback time and timeframe values.
- Enter the Visitor count manually to display in the notifications. You can adjust the count by increasing or decreasing them.
-
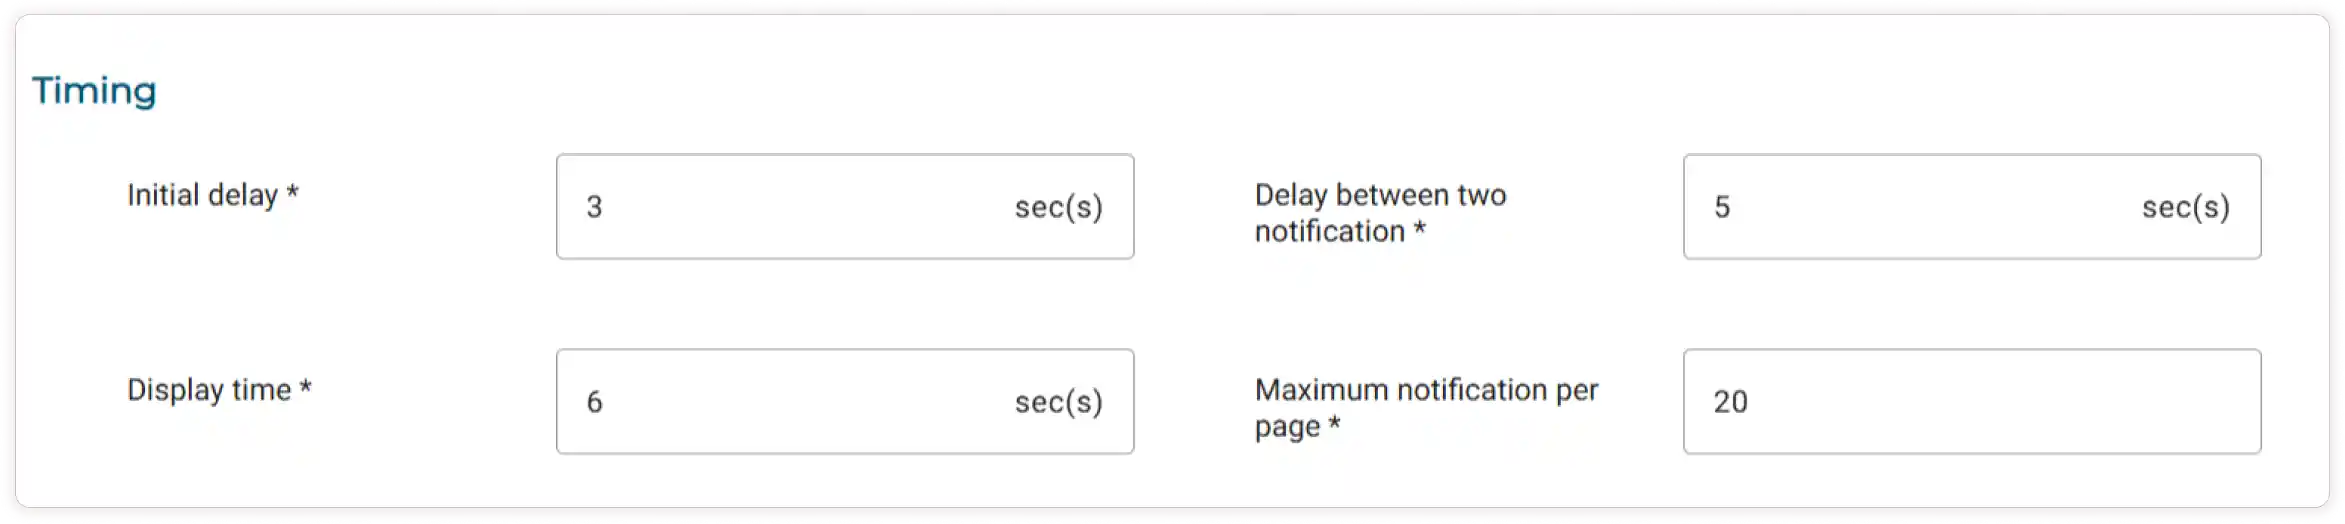
Enter the Initial delay in seconds to determine how long before the first notification appears.
-
Specify the Display time for how long each notification will remain visible.
-
Set the Delay duration between each notification.
Note You can adjust these values as needed.
-
Enter the maximum number of notifications that can be displayed on each page.
-
Check the box to allow the customers to close the notification.
Note If a customer closes a notification by clicking the close icon, it will go away for a bit but will show up again when they come back from another page.
-
To display notifications on all pages, select All Pages. If you prefer to show notifications only on certain pages, then select Specific Pages and check the boxes for the pages you want to include.
-
Turn on the toggle to configure the Desktop and Mobile View settings.
- Display Direction will be constant for both Desktop and Mobile Views.
- Choose the Animation Type using the dropdown menu.

- Click the Save button to apply the setting successfully.
How to Configure Sold Count Notifications?
-
In the Live Notification module, enable the toggle for the Sold Count Notifications feature.
-
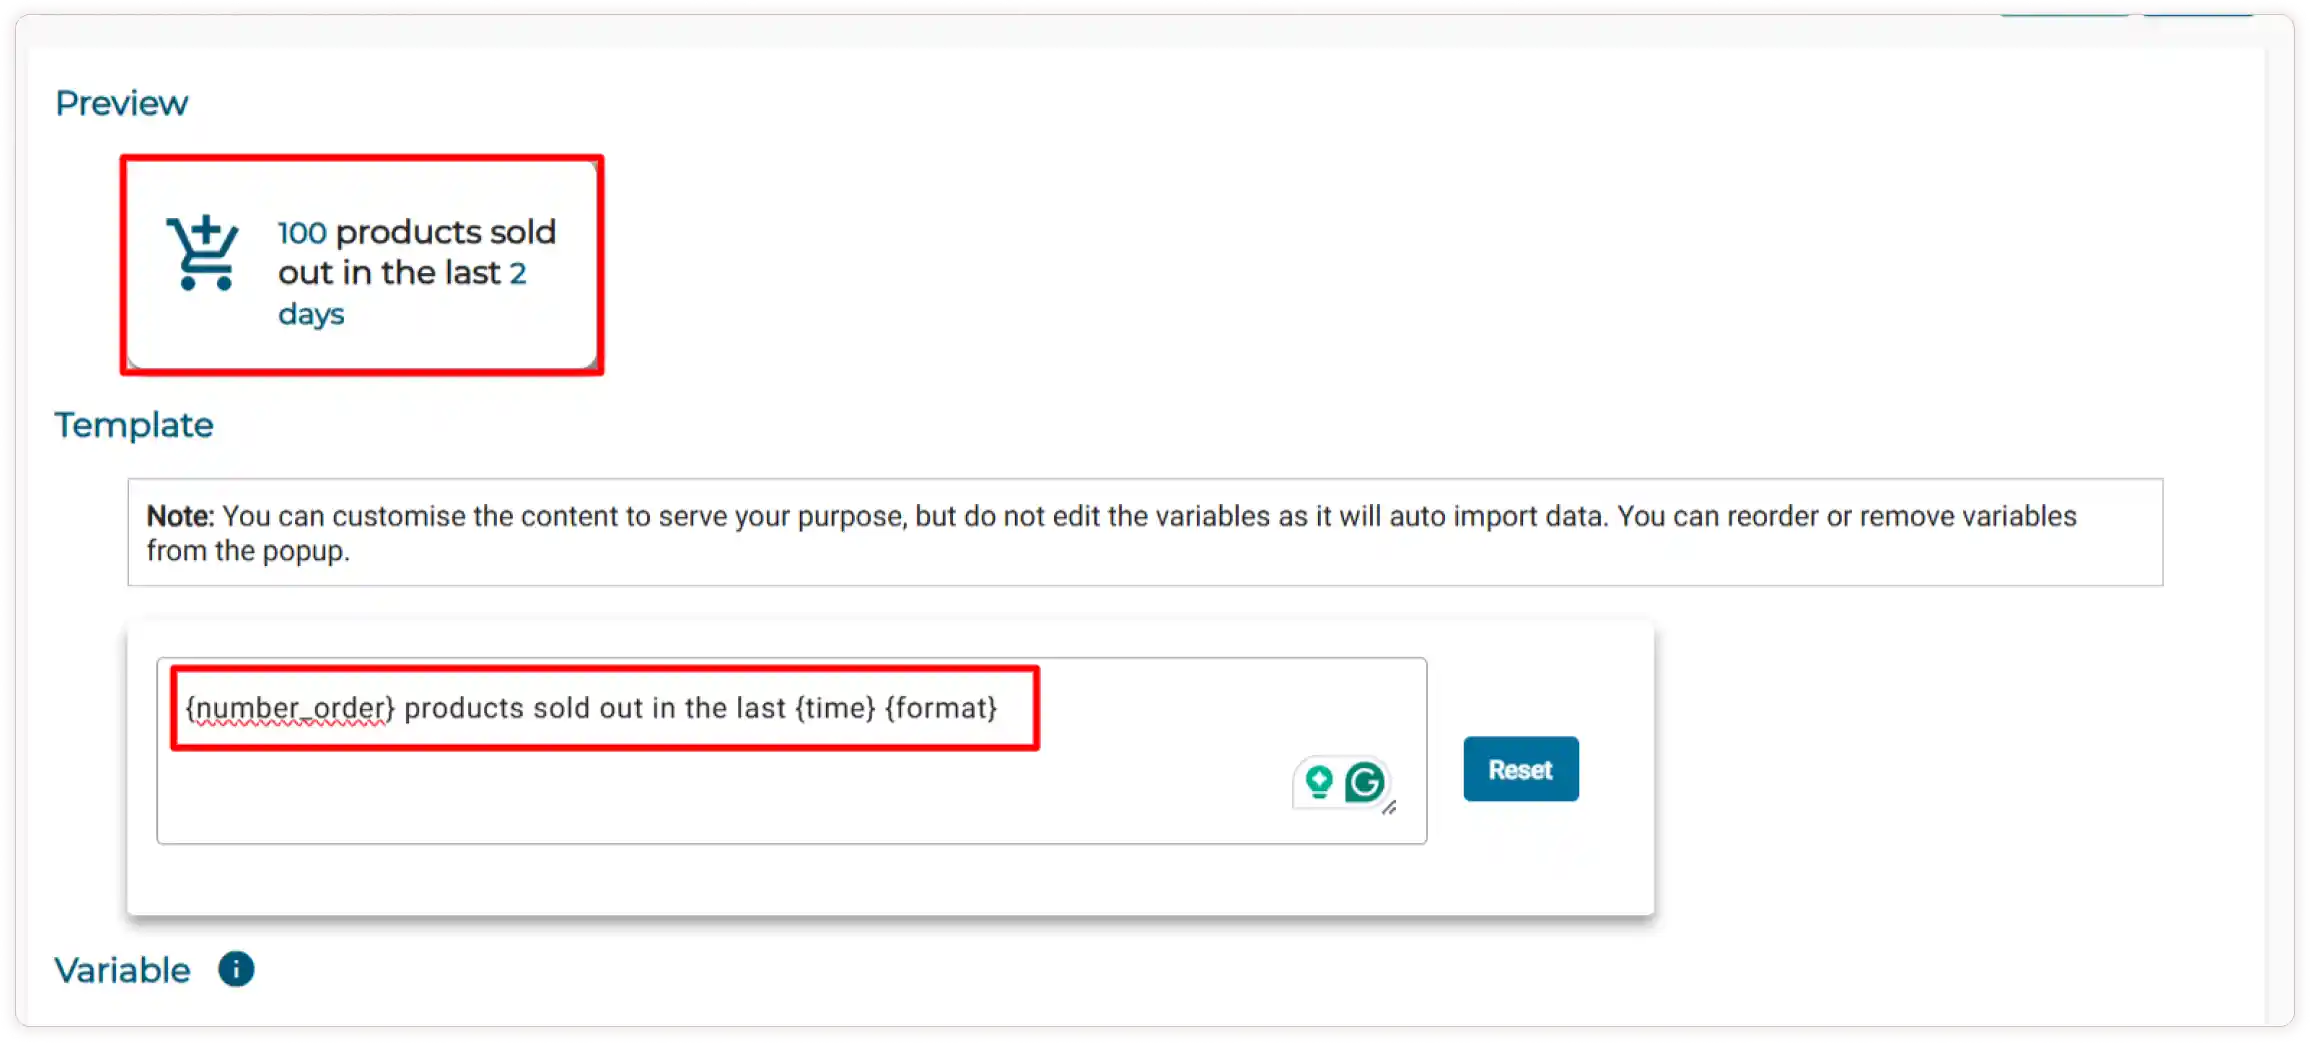
You can customize the content as needed but cannot change the variables.
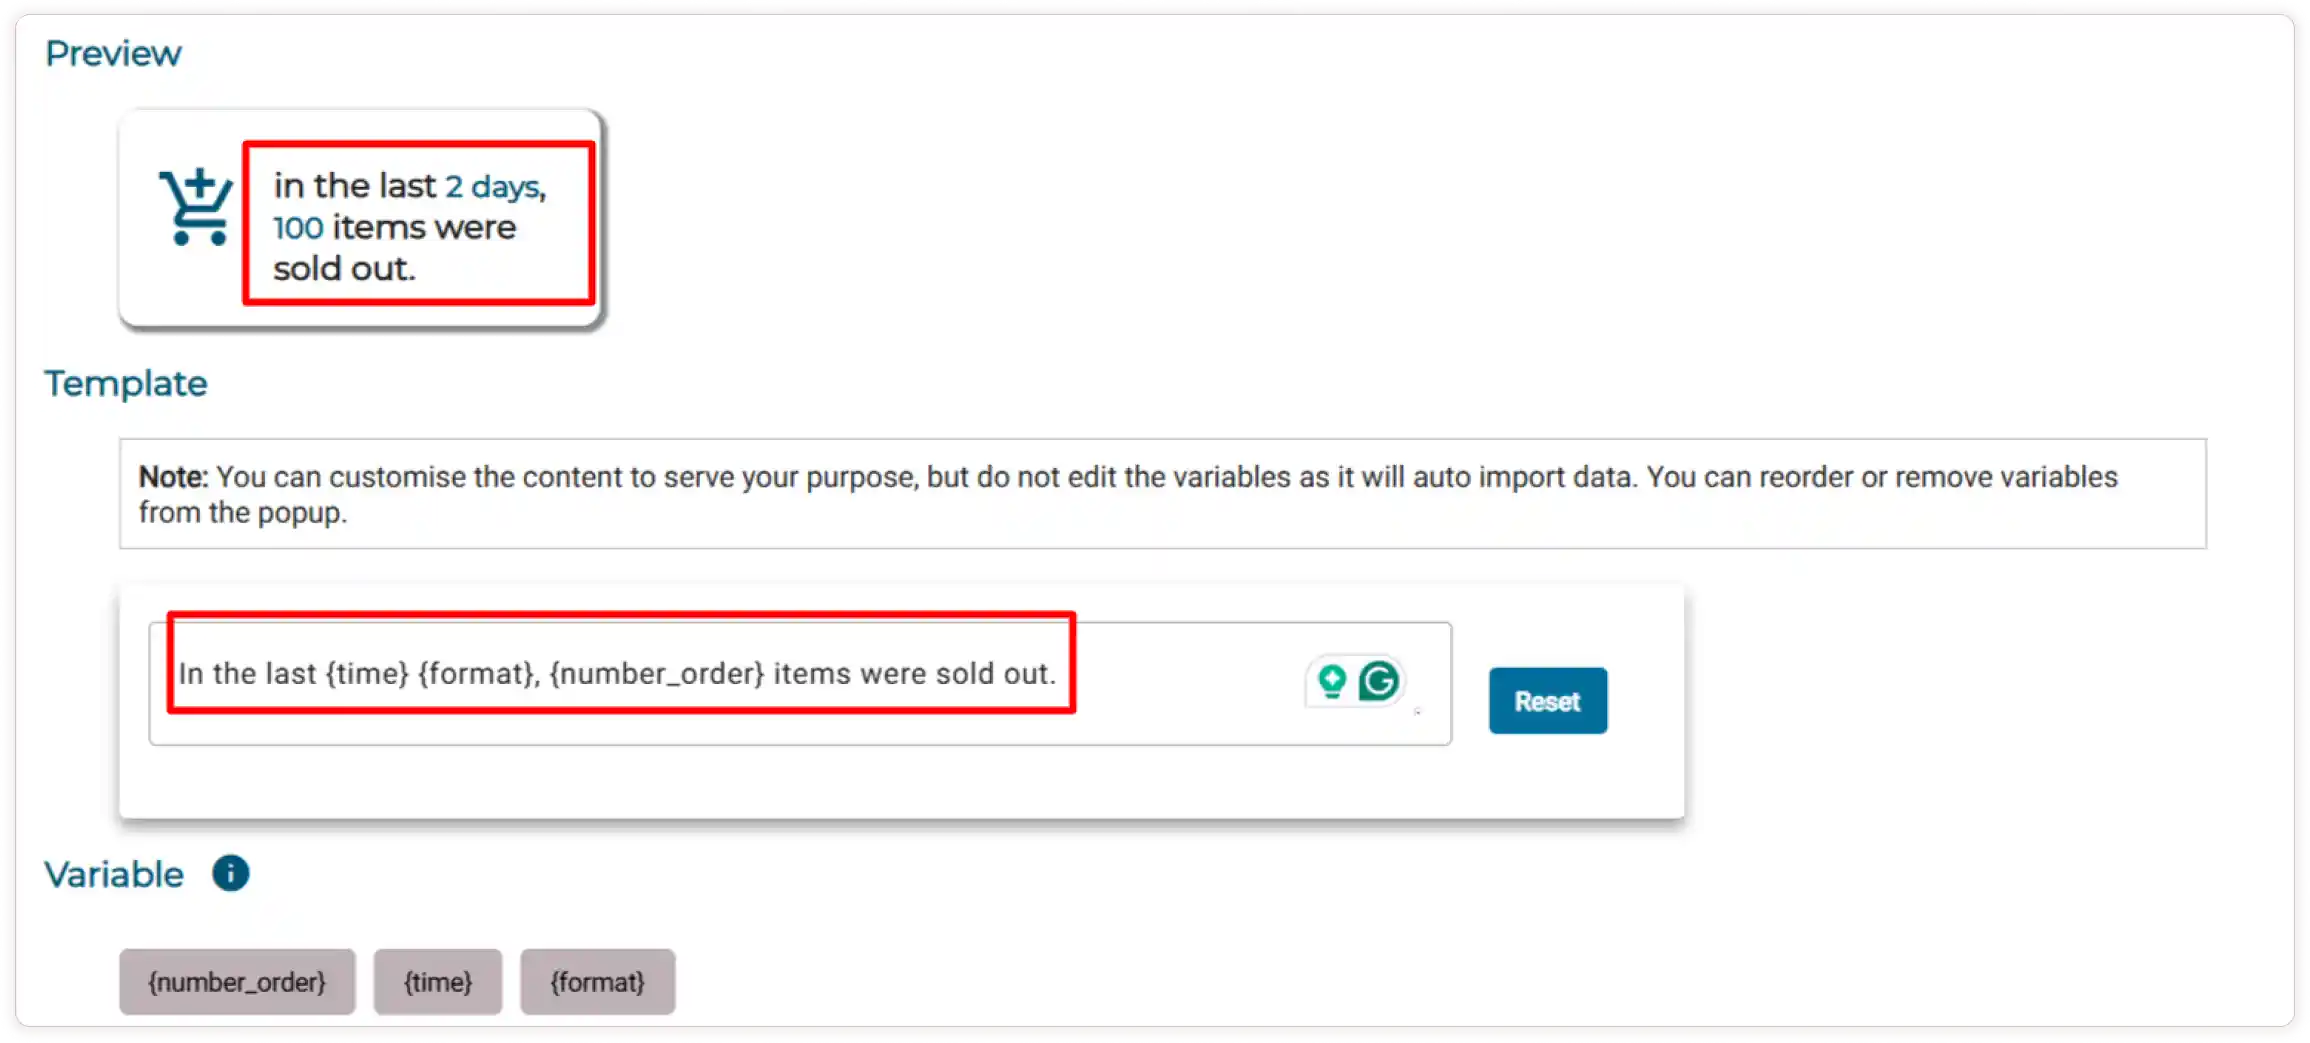
For example, you can modify “100 products sold out in the last 2 days” to “In the last 2 days, 50 items were sold out.”
-
You can rearrange or remove the variables as needed. (eg., {time} and {format}have been removed)
-
To add removed variables, copy the {time} and {format} variables and paste them in the designated box
-
Click the Reset button to undo all changes.
-
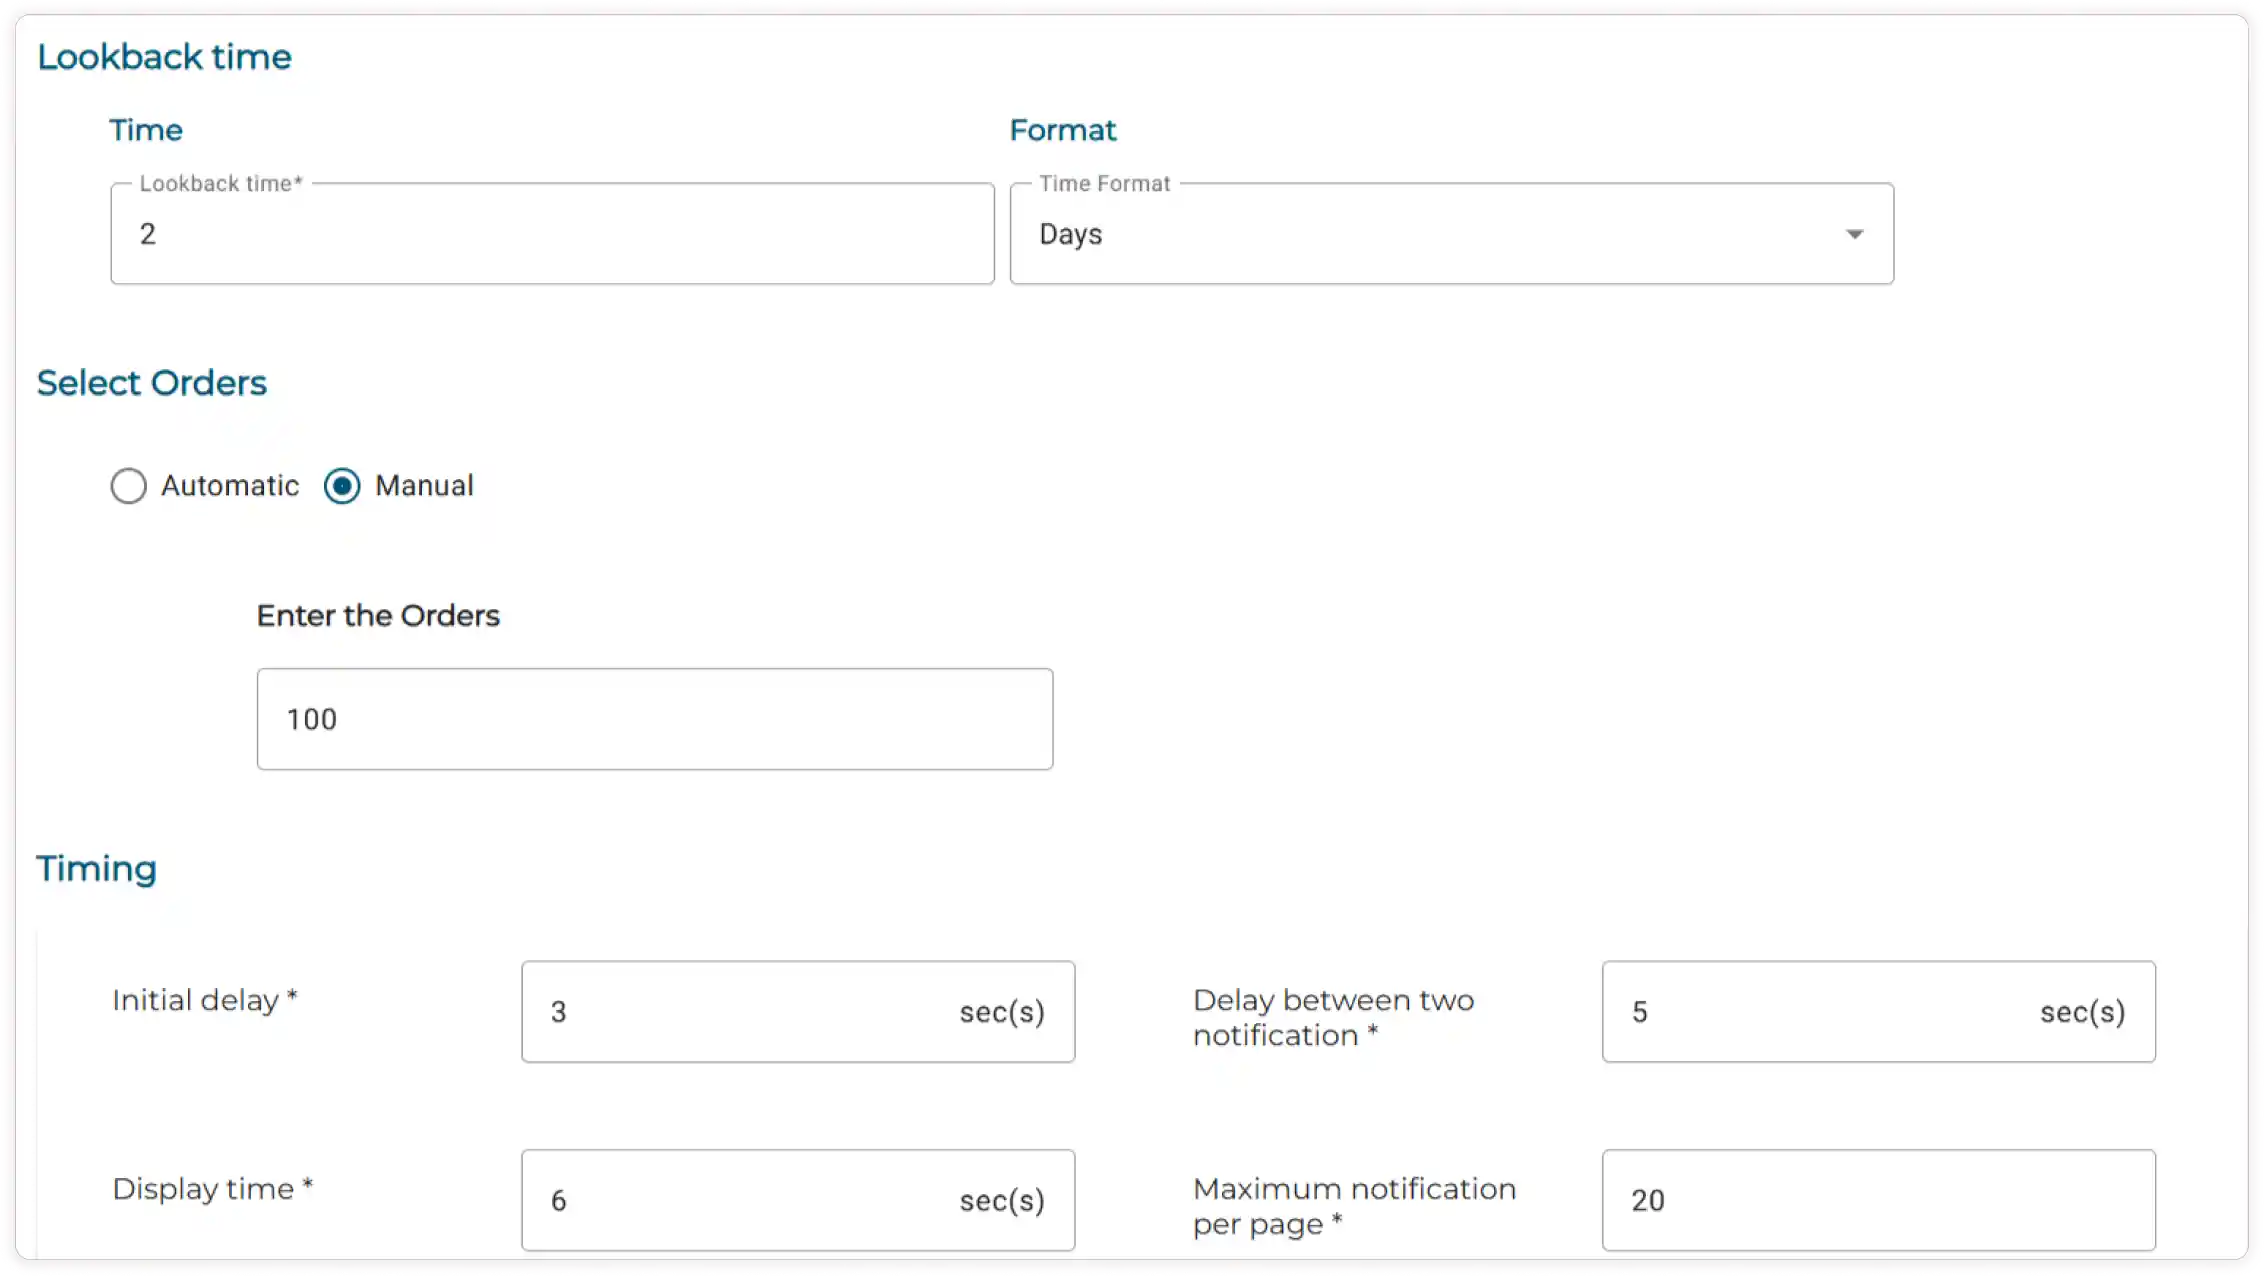
Enter the Lookback time for displaying sold-out product counts (e.g., 1 minute ago, 5 minutes ago, 1 hour ago).
-
Use the dropdown menu to select your preferred Time format for showing sold-out counts, such as minutes, hours, days, or months.
-
Choose a notification method: Automatic or Manual. If you select Manual, enter the number of orders that have sold out.
-
Enter the Initial delay, Display time, and Delay time between notifications for displaying sold-out counts. You can adjust these values by increasing or decreasing them.
-
Set the maximum limit for the number of notifications displayed per page.
-
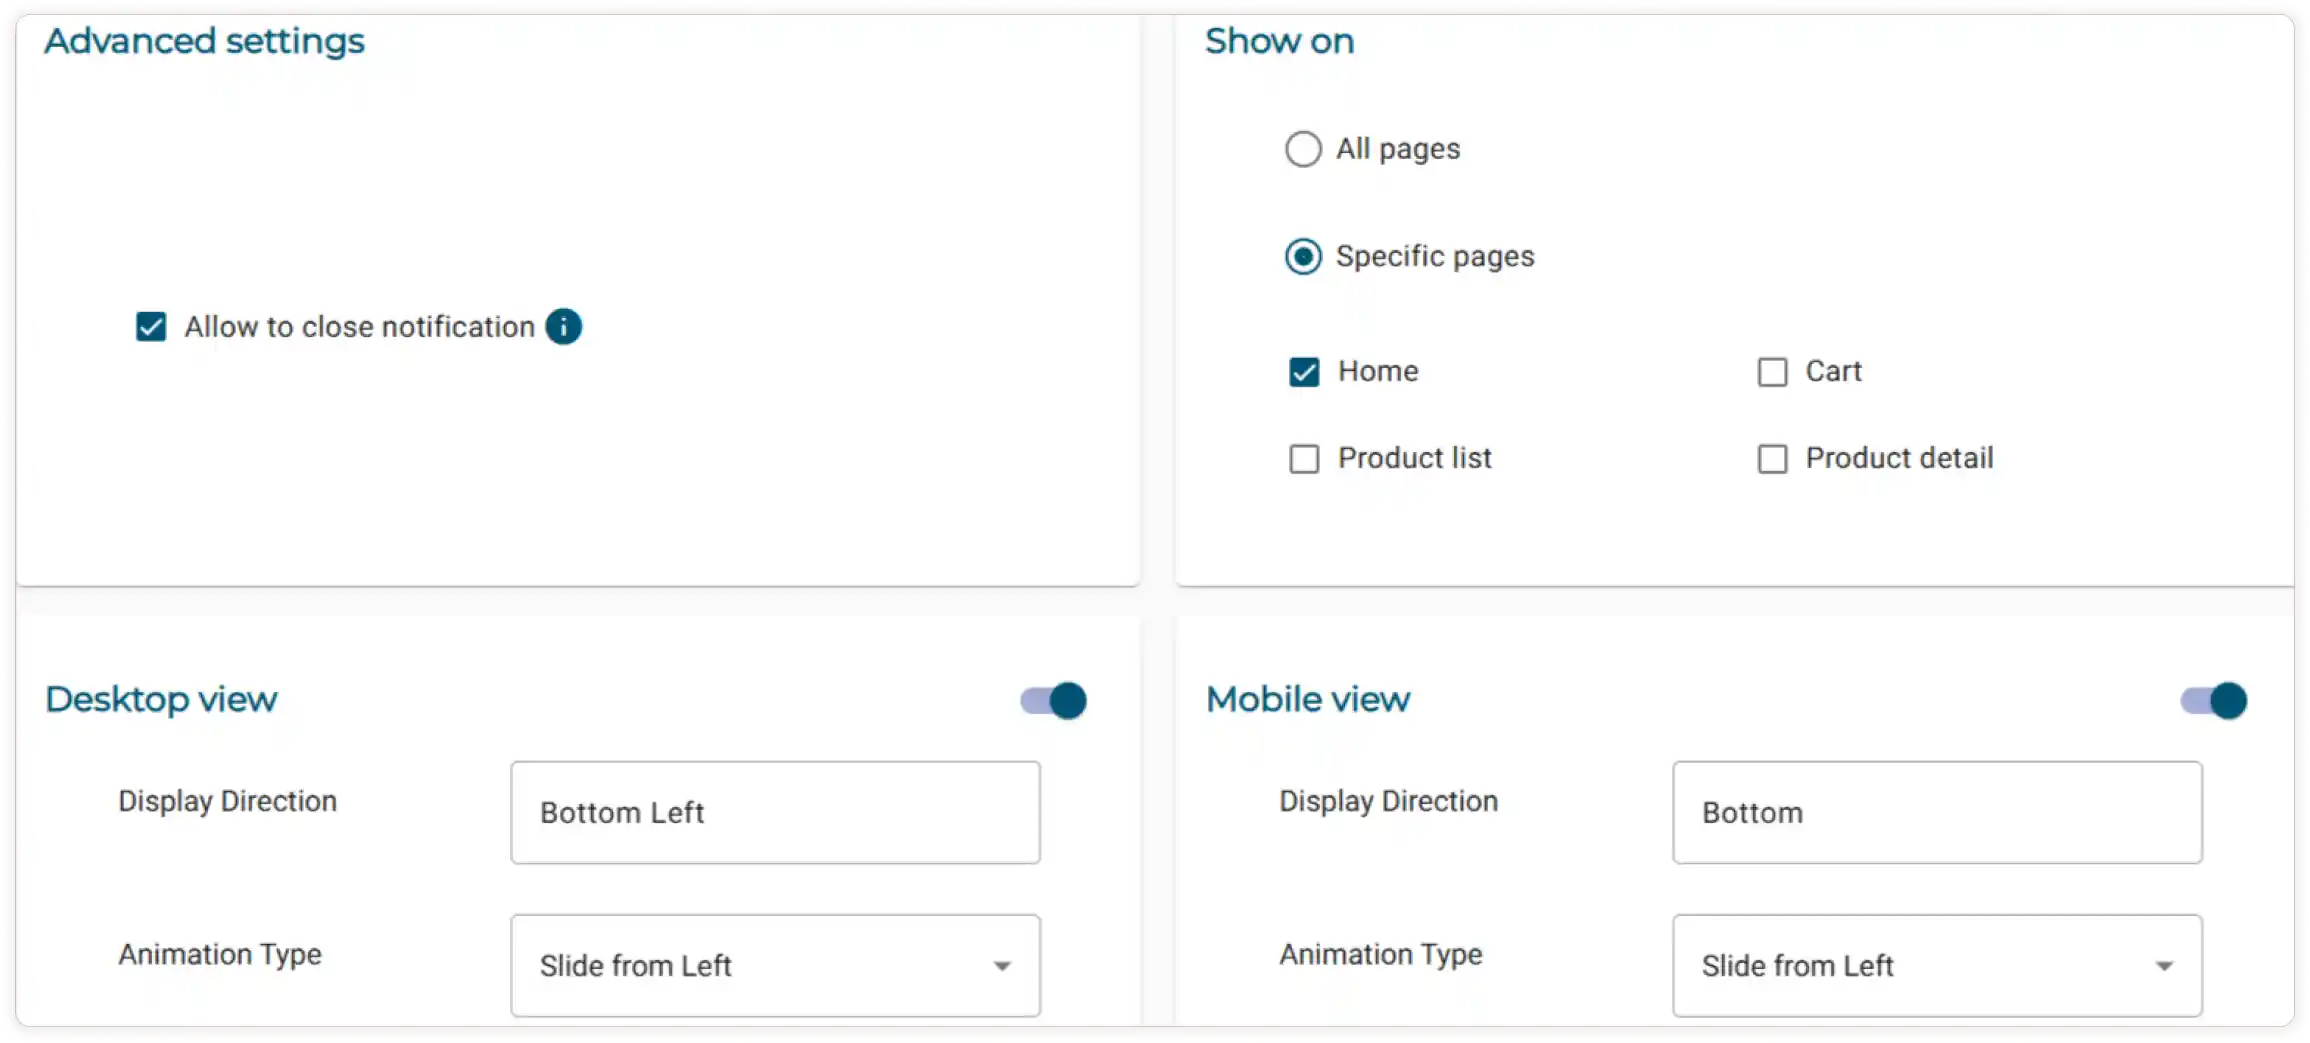
Check the box to allow the customers to close the notification.
Note If a customer closes a notification by clicking the close icon, it will go away for a bit but will show up again when they come back from another page.
-
To display notifications on all pages, select All Pages. If you prefer to show notifications only on certain pages, select Specific Pages and check the boxes for the pages you want to include.
-
Turn on the toggle to configure the Desktop and Mobile View settings.
-
Display Direction will be constant for both Desktop and Mobile Views.
-
Choose the Animation Type using the dropdown menu.
-
-
Click the Save button to successfully apply the settings.
-
Once you have configured the settings for the features, You can edit the settings by clicking the Edit button for each feature.